Student Handbook
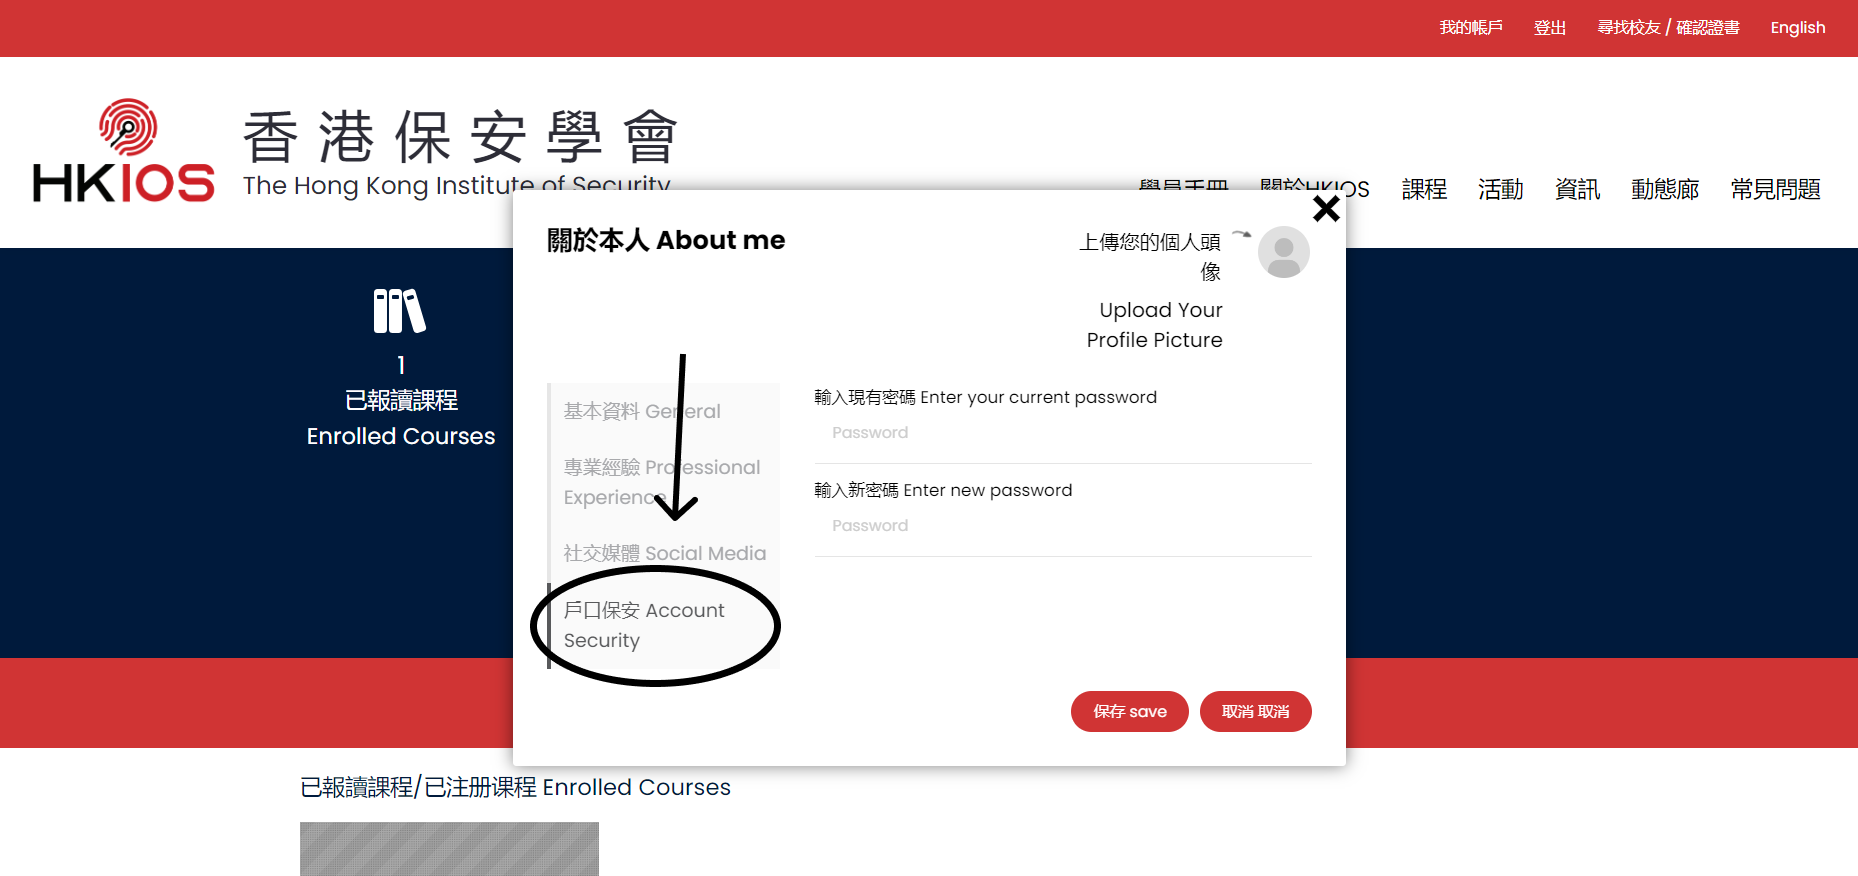
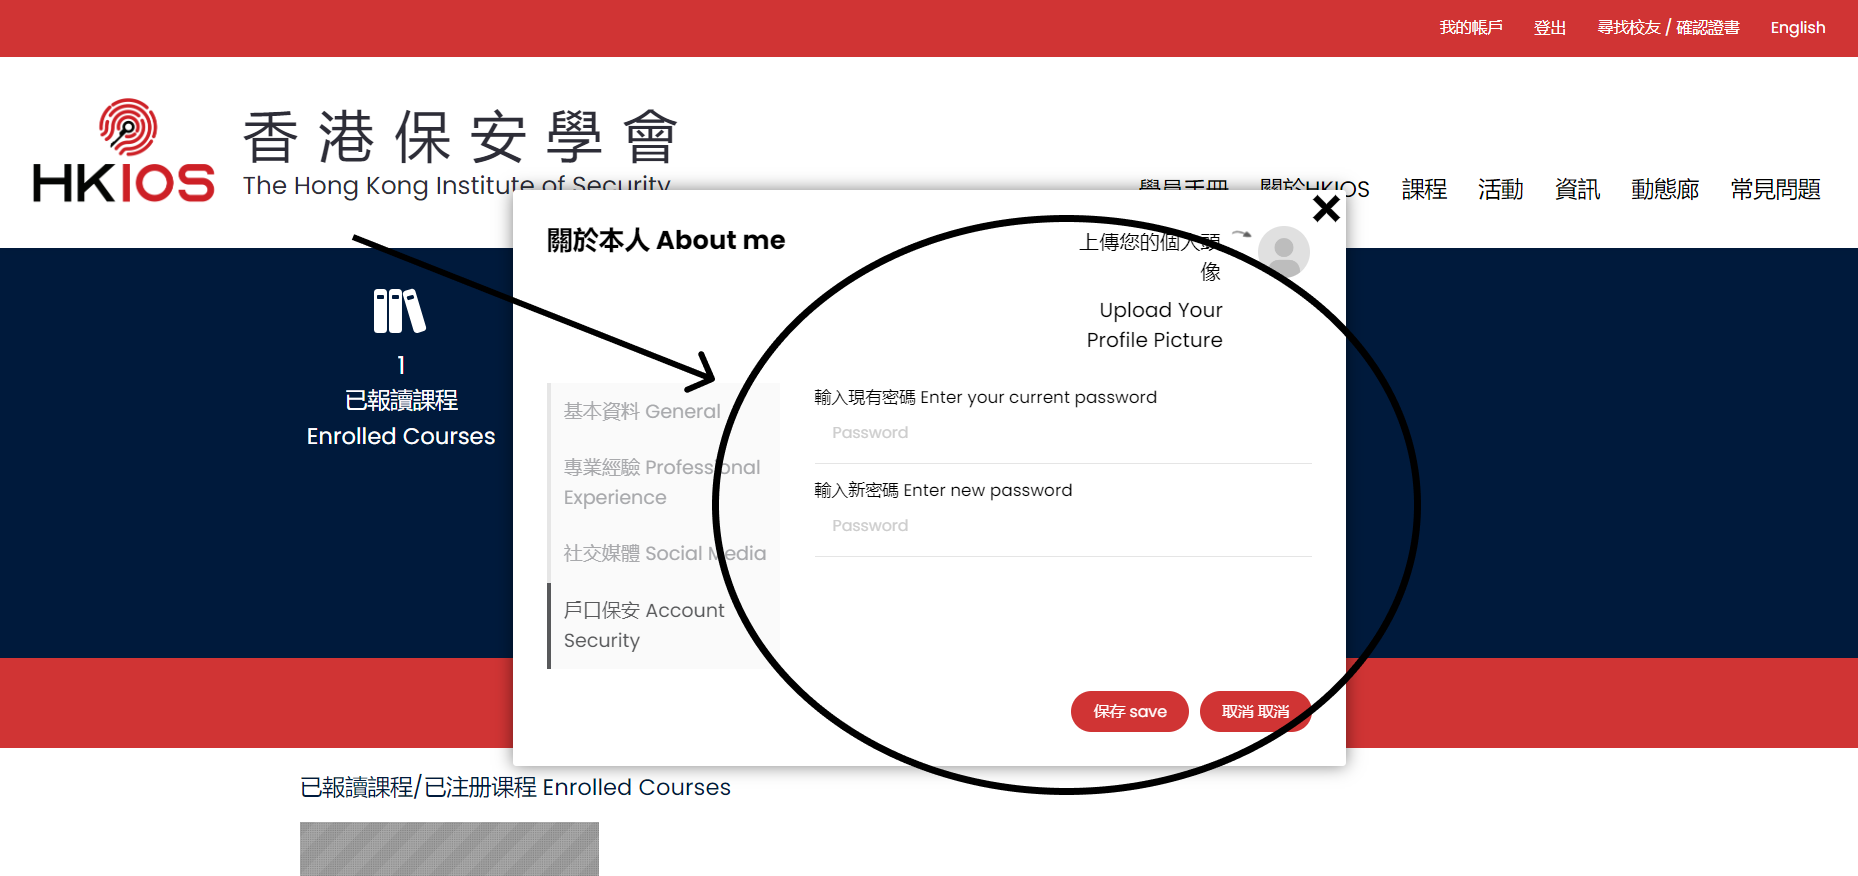
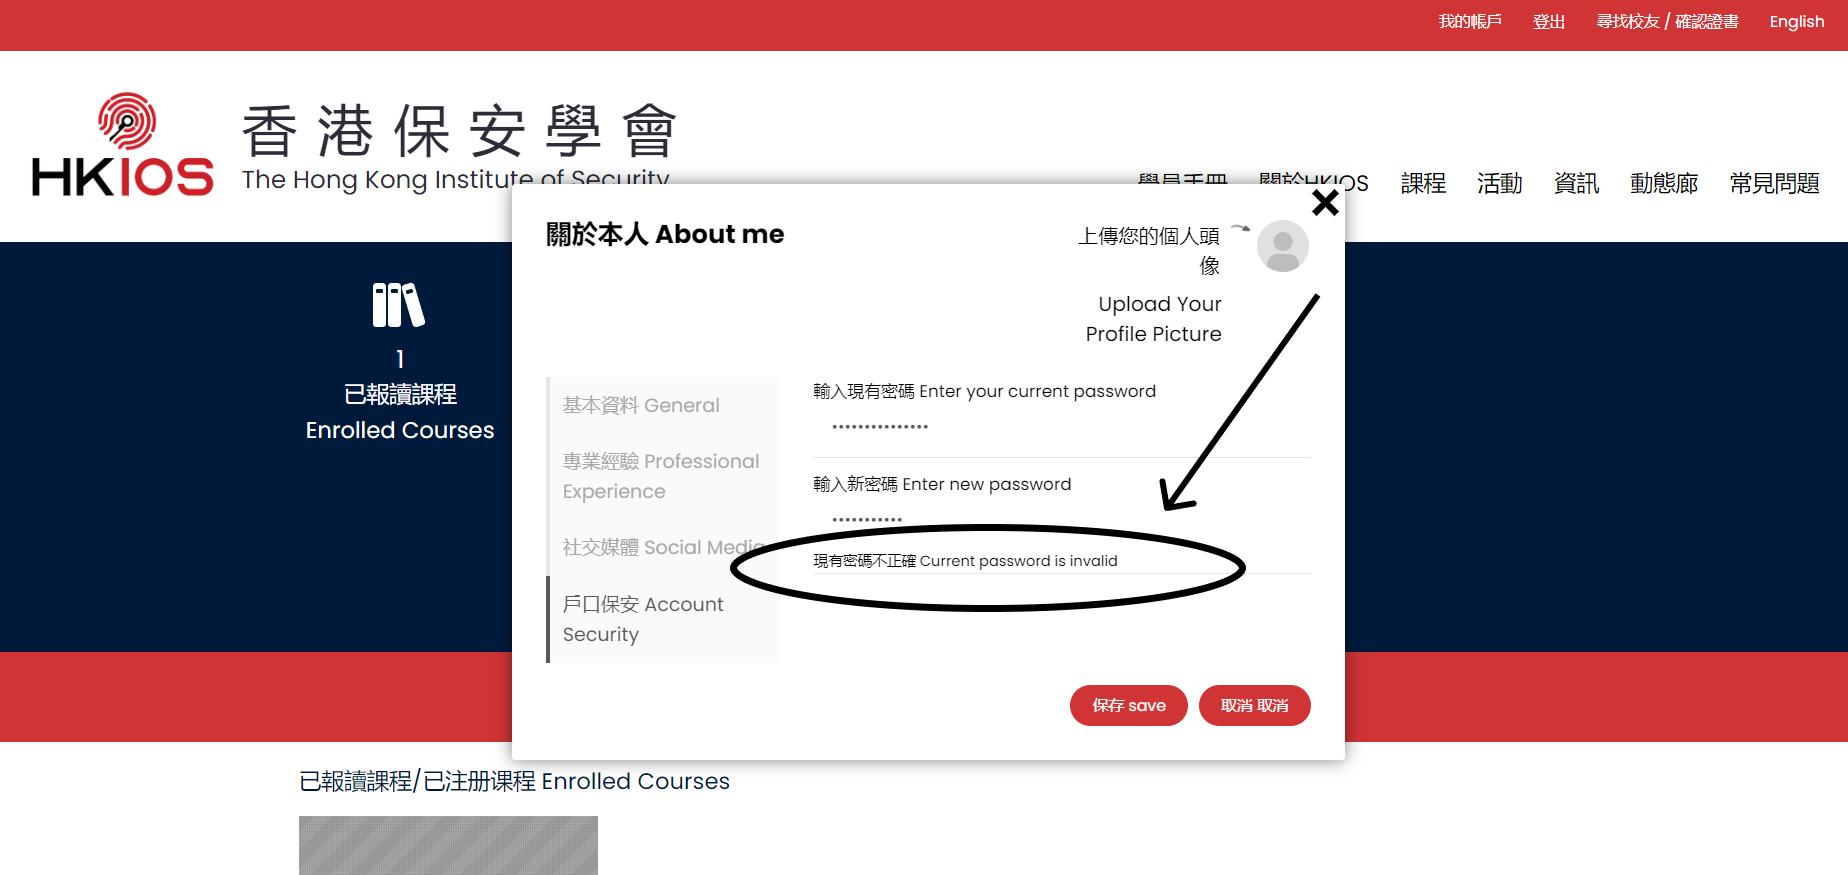
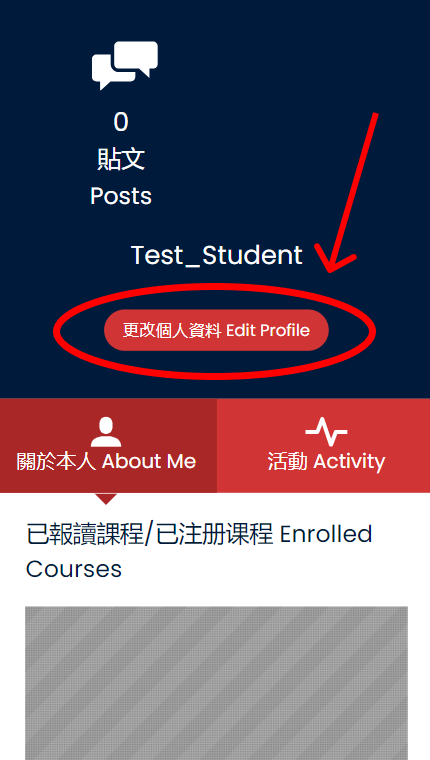
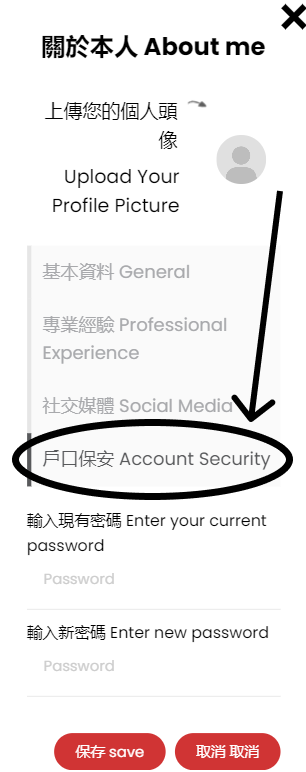
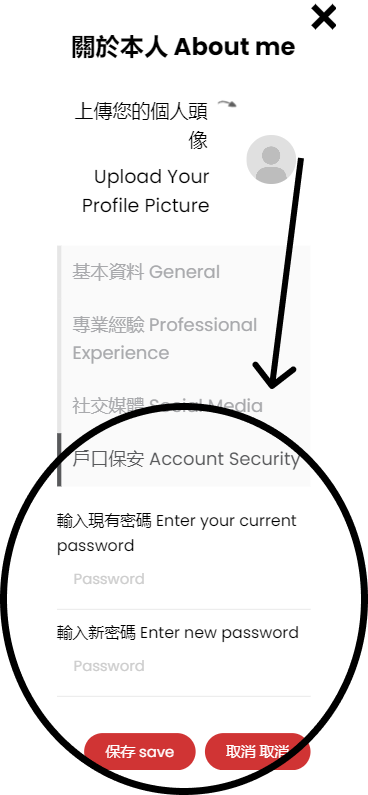
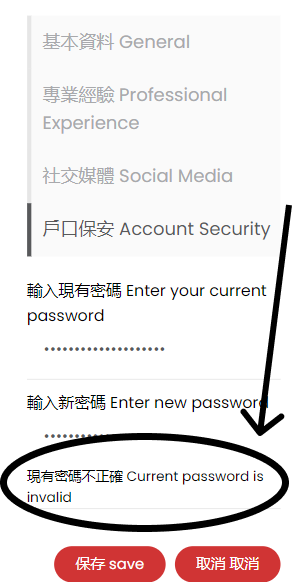
Change Password on Personal Account
Computer
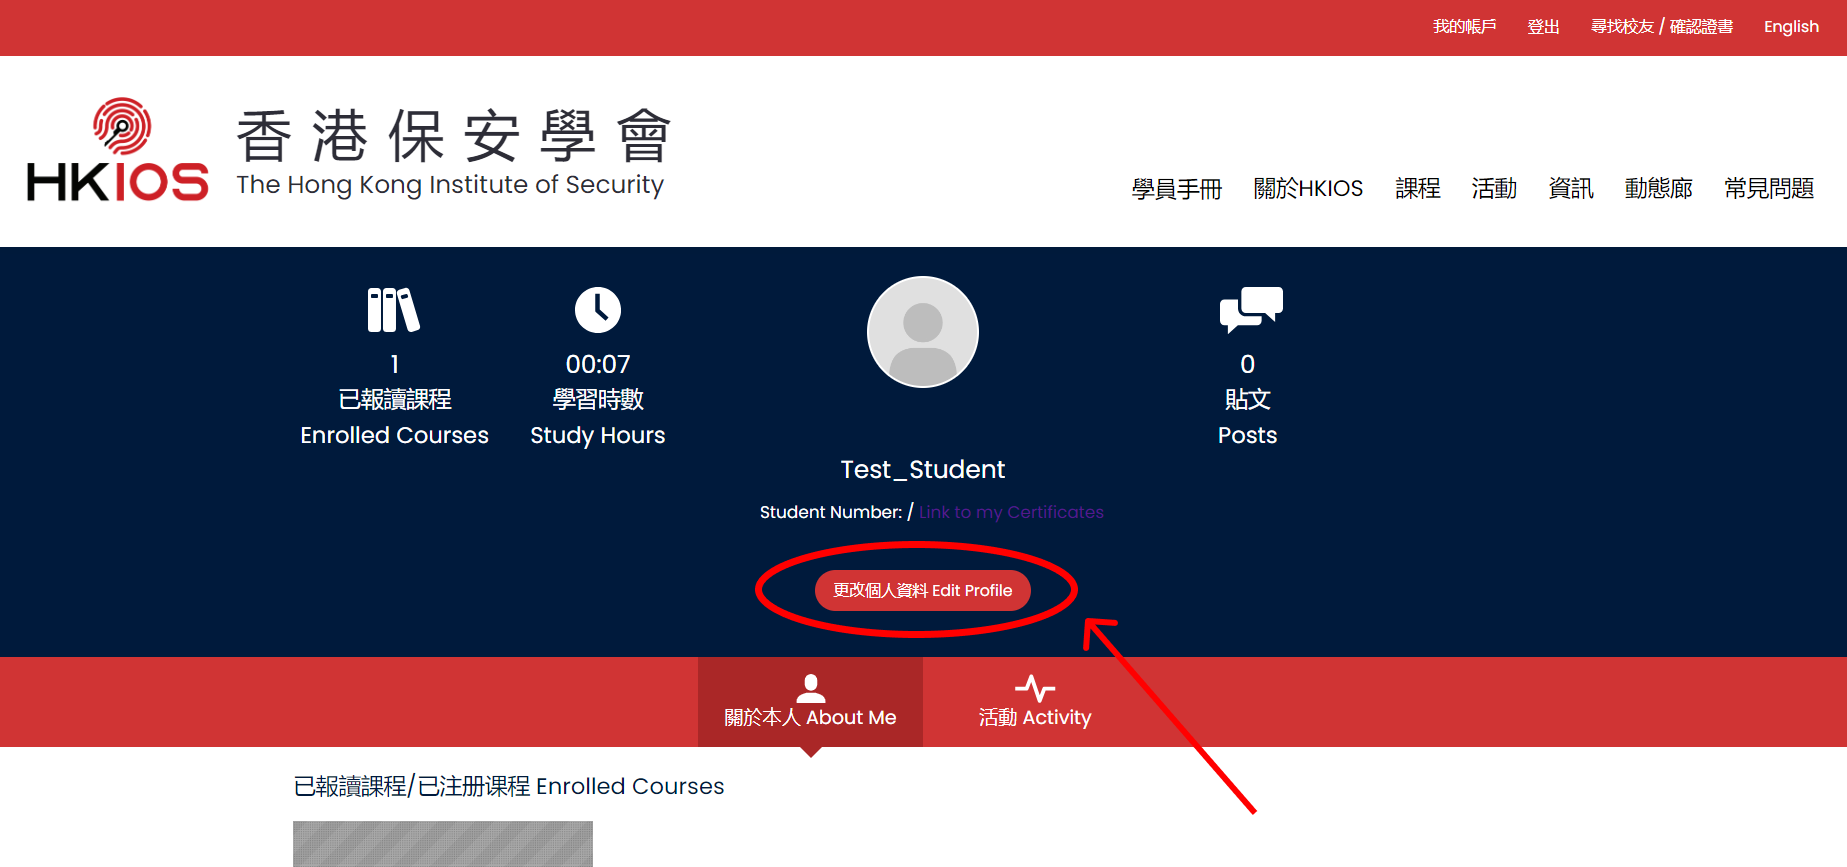
Step 2: Click on ‘Edit Profile’ underneath your account name. This will open the edit profile tab.

Mobile
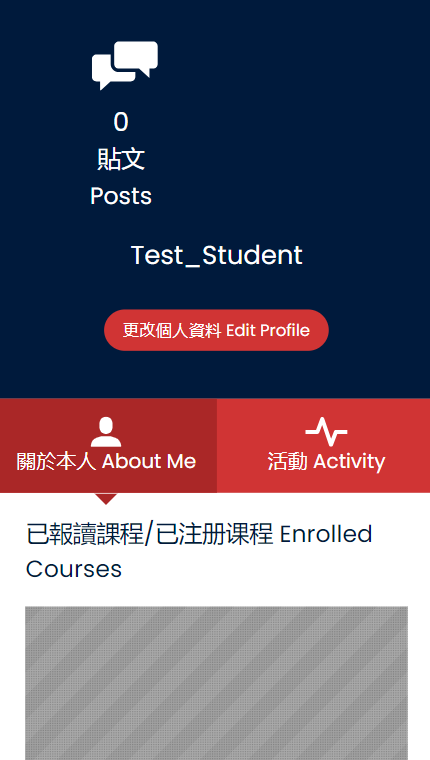
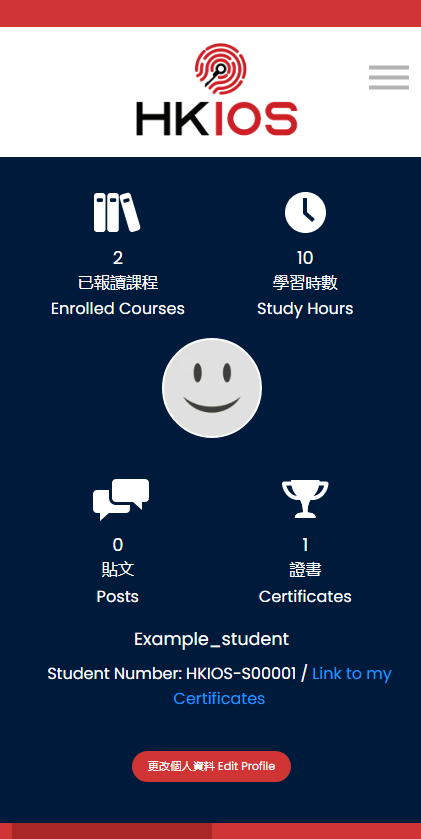
Step 2: Click on ‘Edit Profile’ button underneath your account name. This will open the edit profile page.
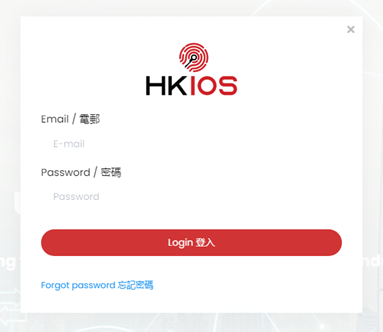
Sign in your account
Computer
Step 2: On homepage, click the ‘sign in’ button on the top right of the page.

Mobile
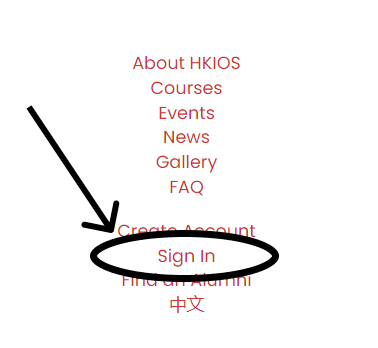
Step 2: On homepage, click the three lines on the top right of the page to open up the mobile menu.


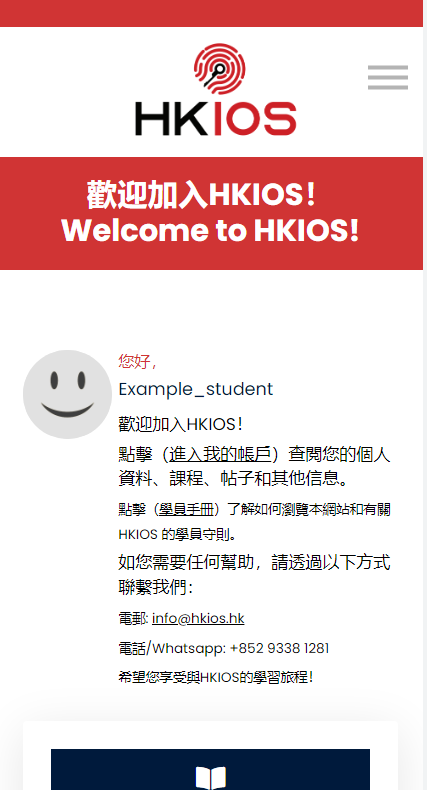
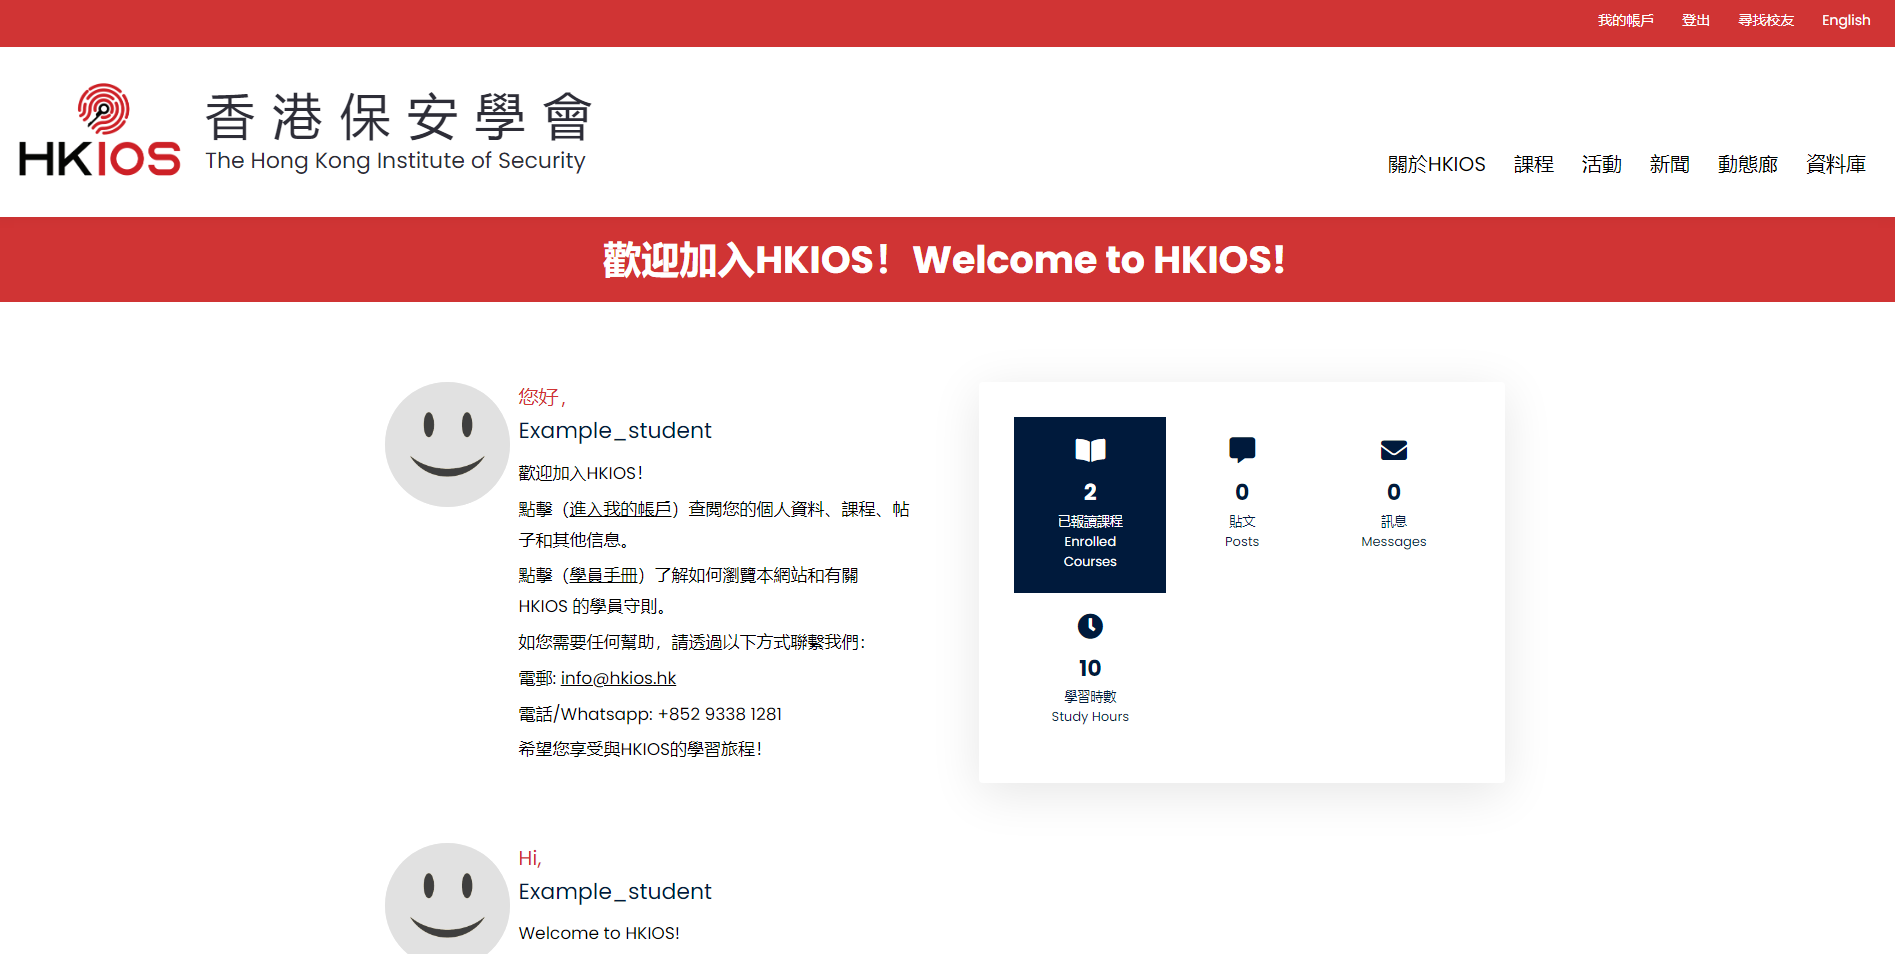
Access your profile
Computer
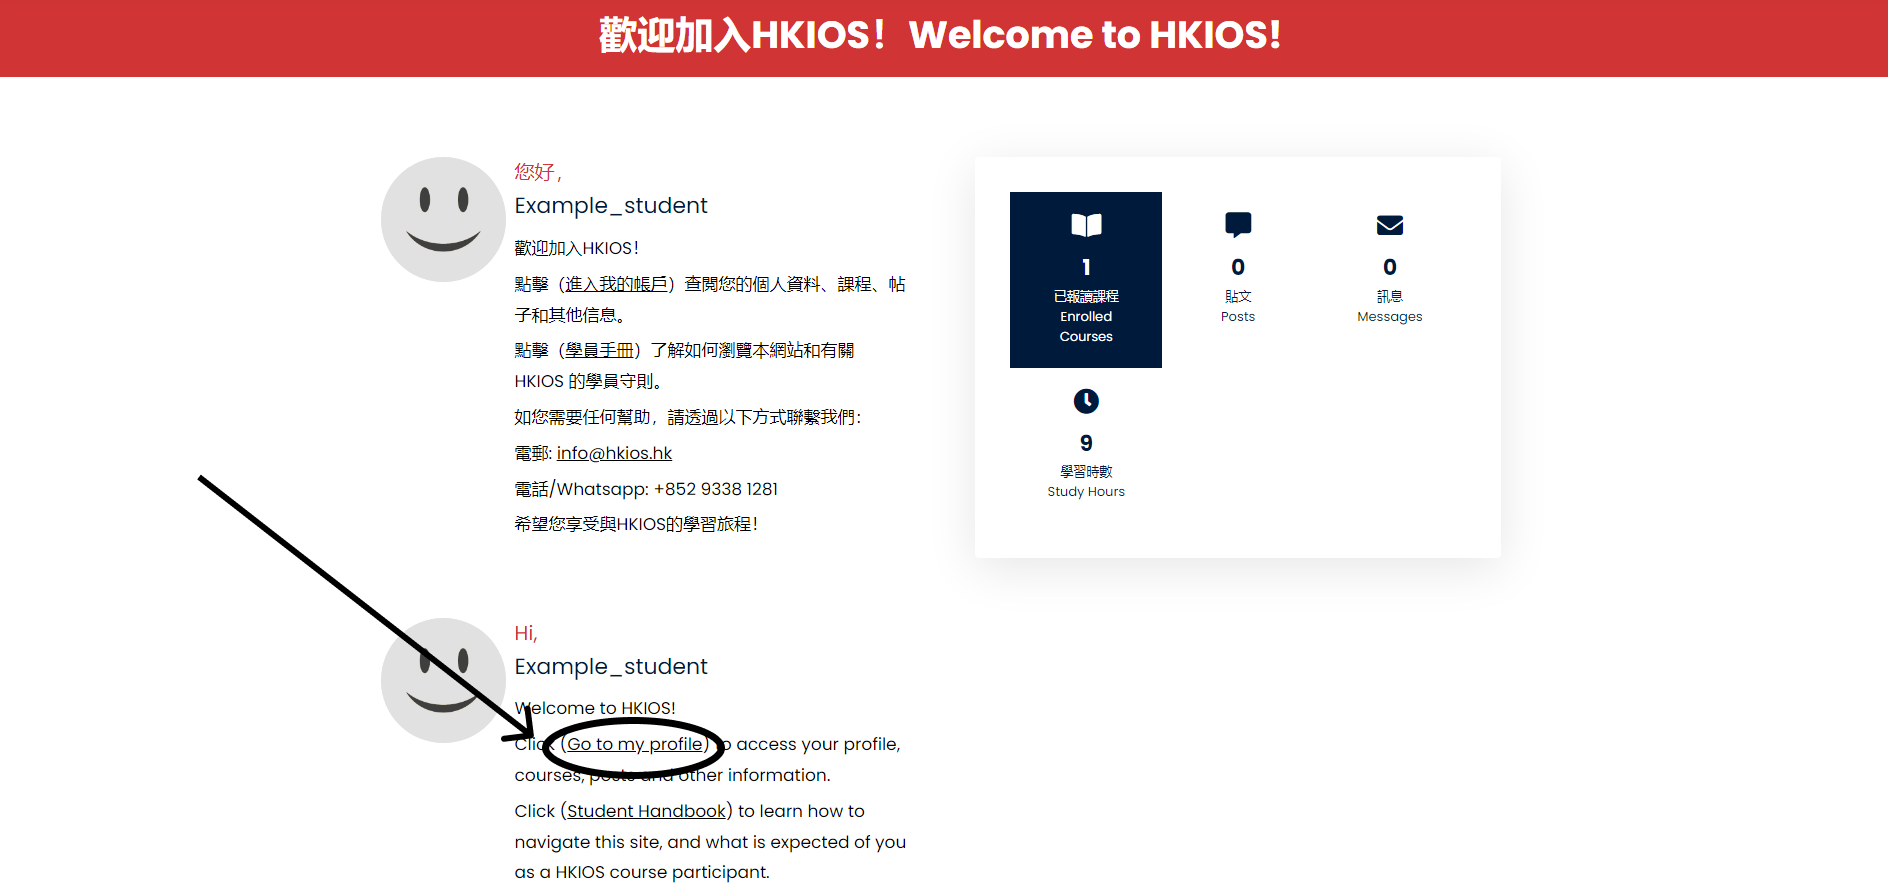
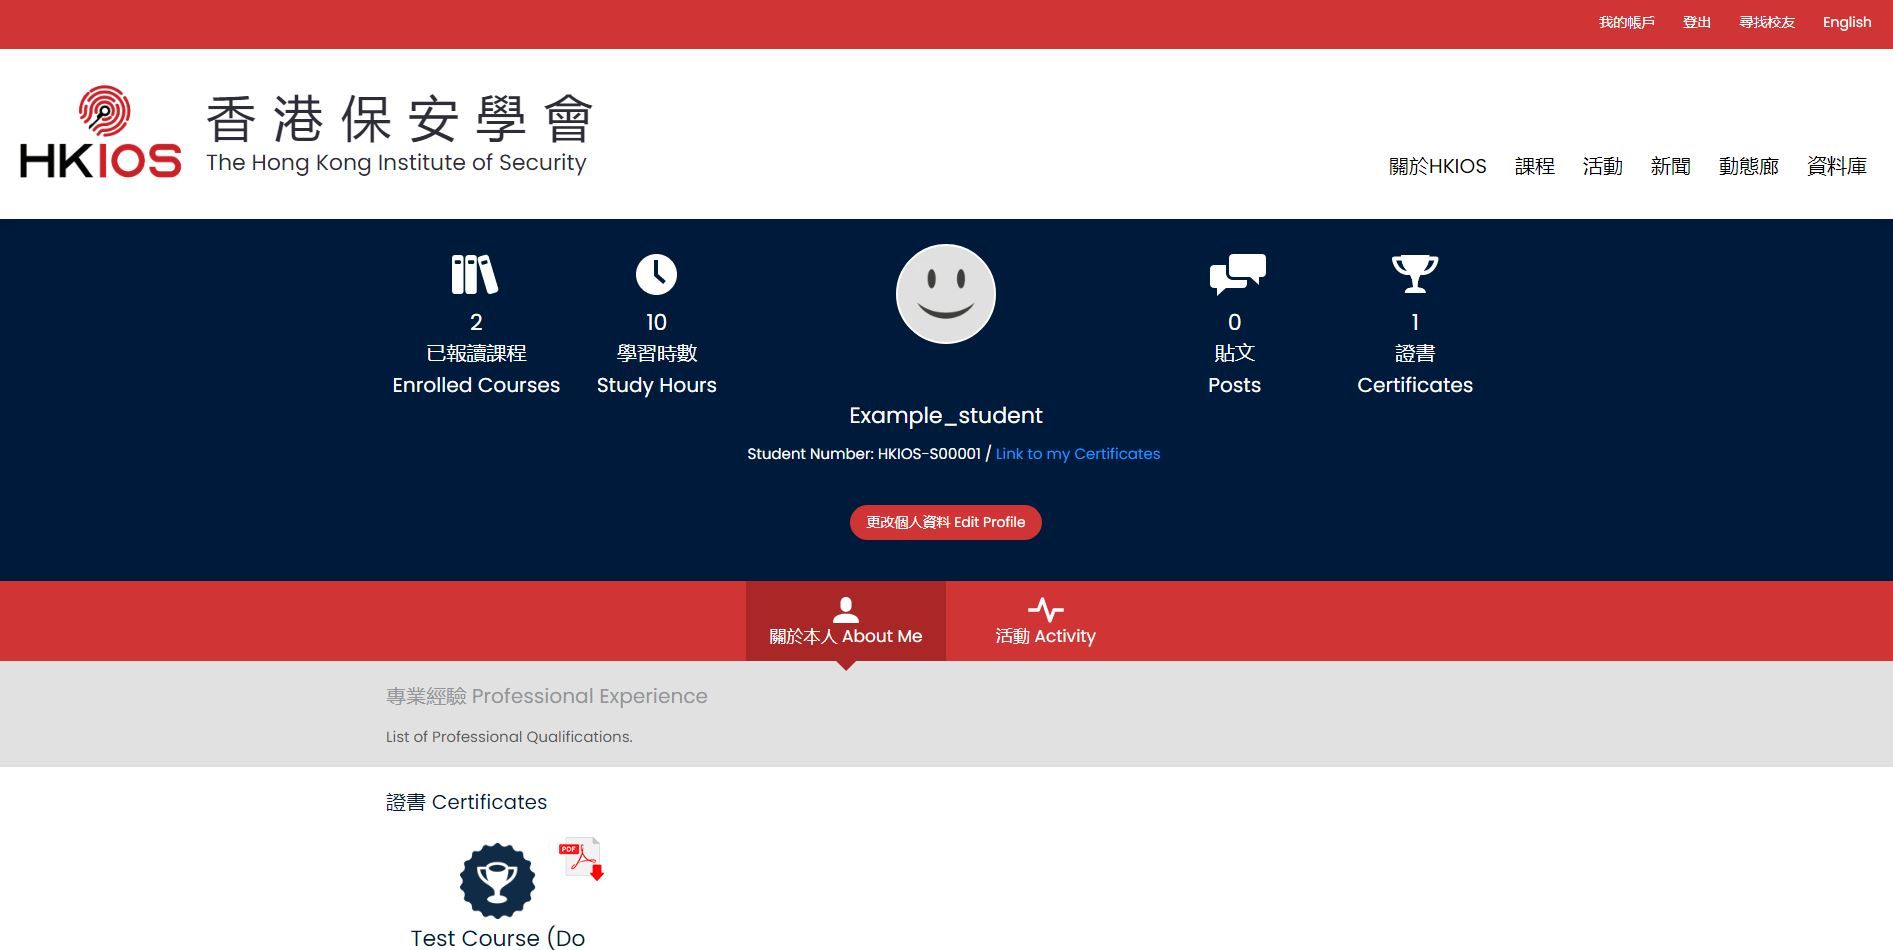
Mobile
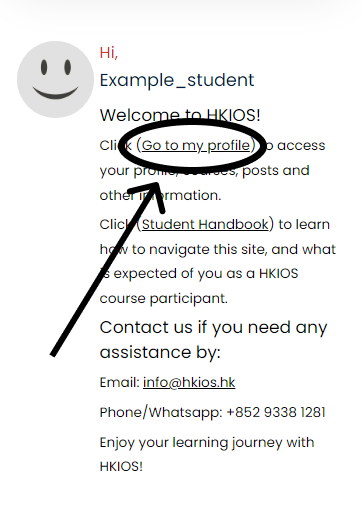
Access your enrolled courses
Computer
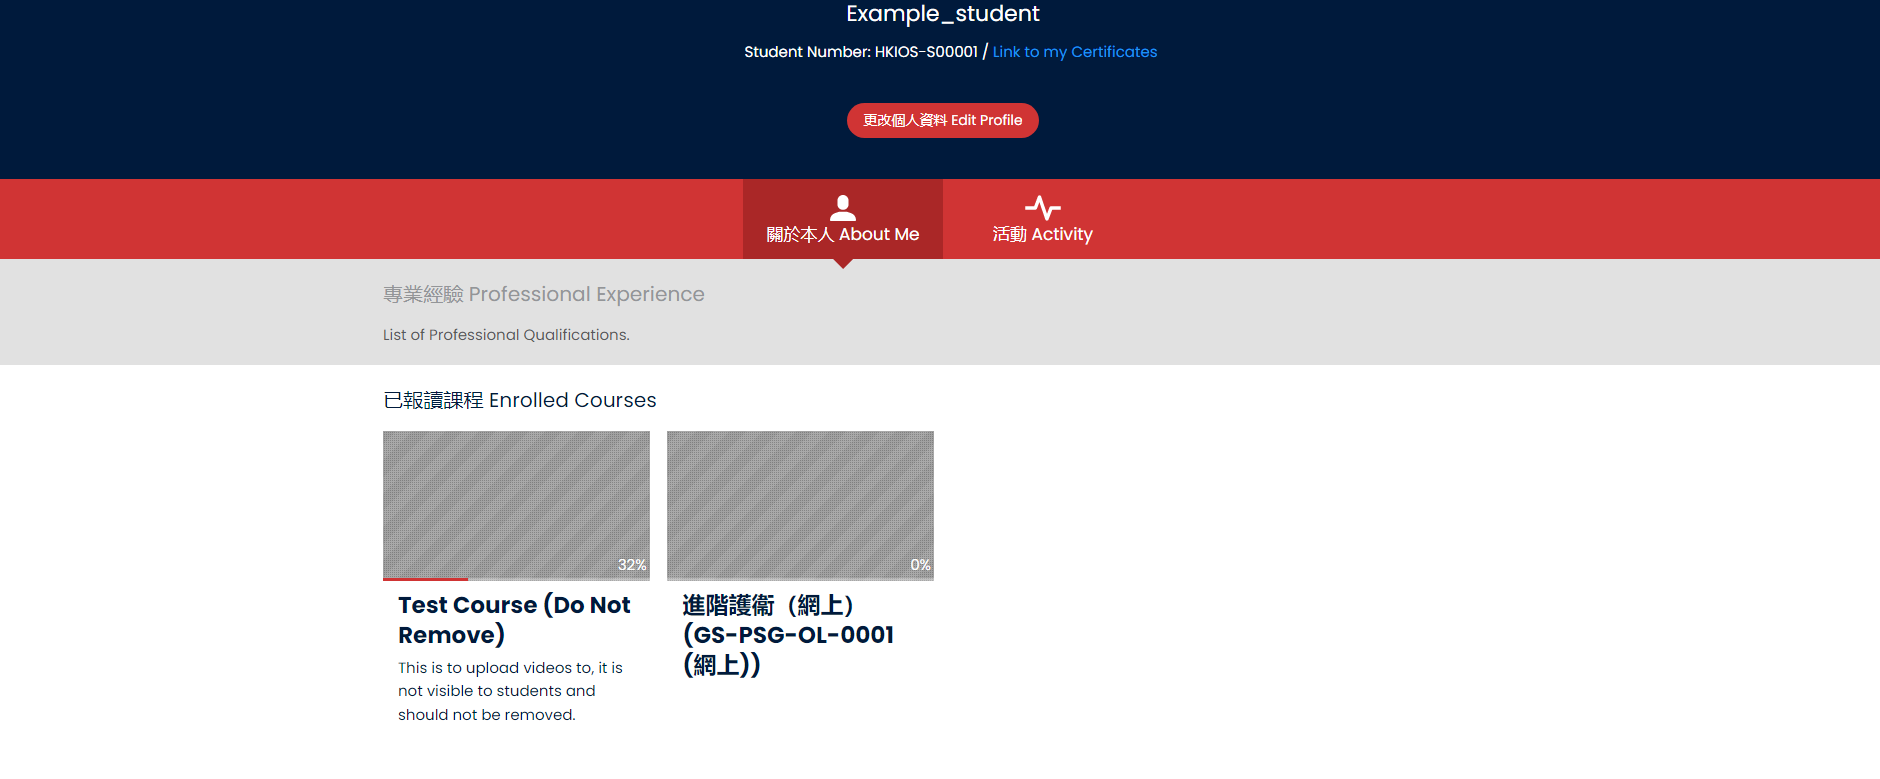
Step 2: Click on any of these courses and you will go to their respective course page.
Mobile
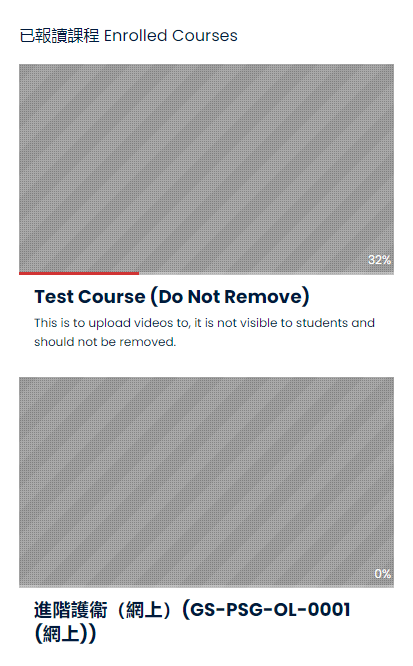
Step 2: Click on any of these courses and you will go to their respective course page.
Navigate inside a course
Computer
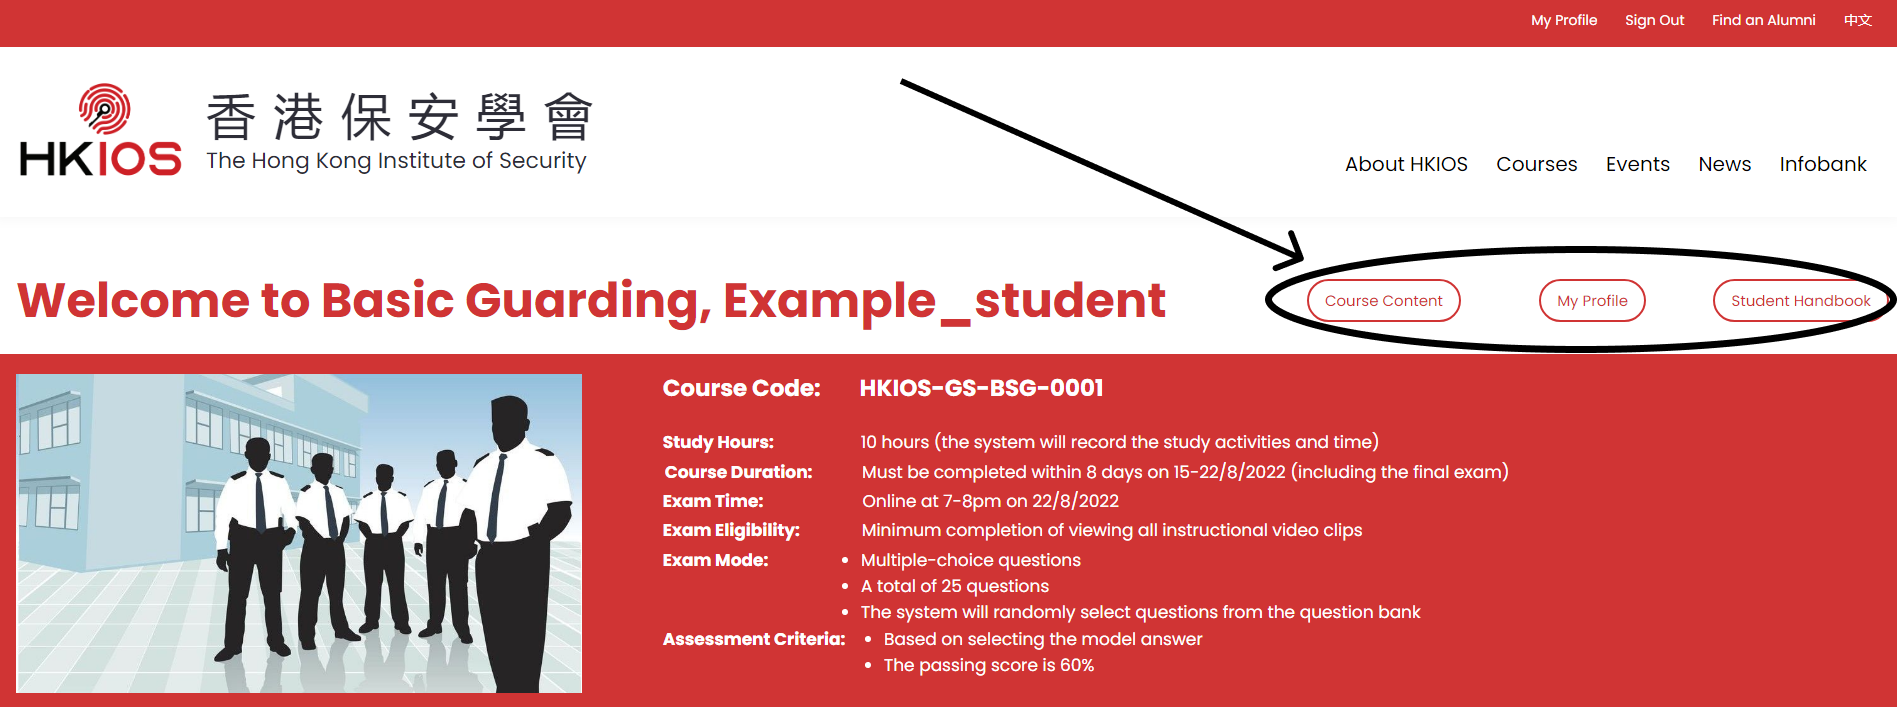

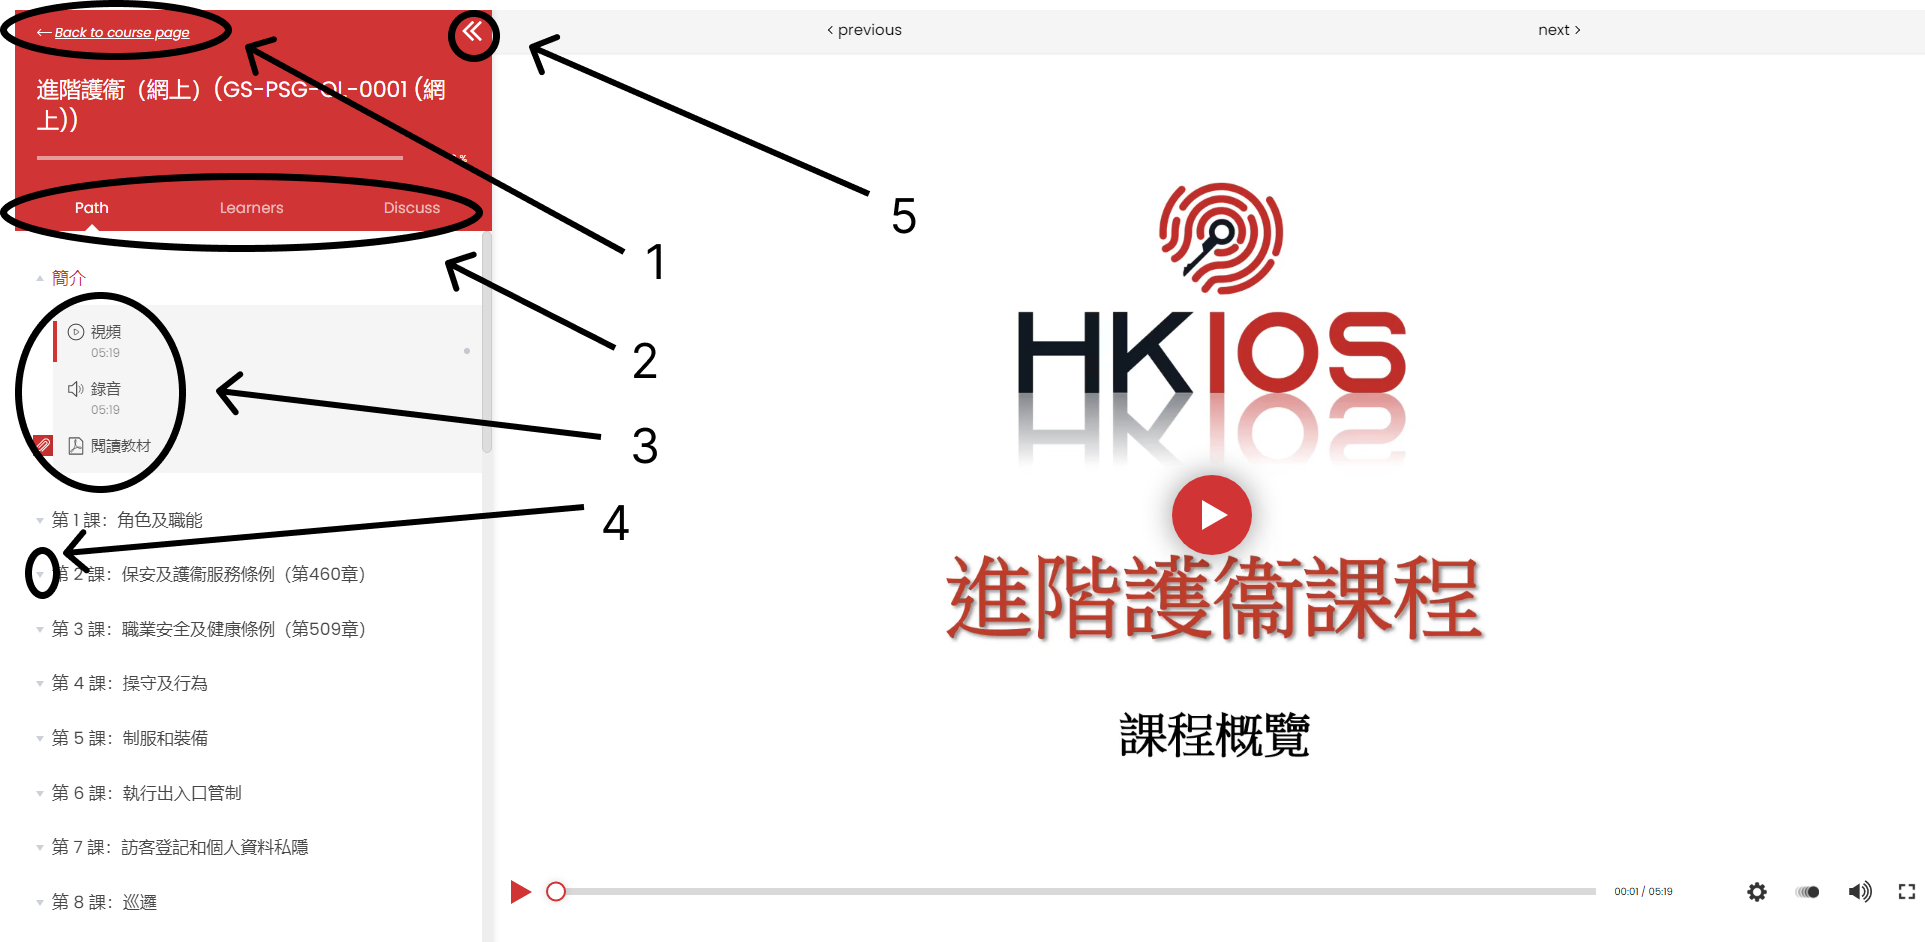
[1] The ‘Back to course page’ button on the top left of the screen will take you back to the course page.
[2] The three navigation buttons on the top of the course content will take you to different functions.
- Path: Path will take you to the content of the course.
- Learners: Learners will show you the other students enrolled into the course, and allow you to see their profiles if you click on their names.
- Discuss: Discuss will allow you to write messages to the other learners of the course, or your trainer. This is useful for asking questions related to certain parts of the course.
[3] Clicking on specific activities within the course will take you to that activity. A red tick will come up to the right of the activity when you have completed it.
[4] Each chapter of the course has a triangle to the left of it – clicking on this triangle will activate a drop-down menu to reveal the activities related to that chapter.
[5] The double arrows on the top right of the course outline will allow you to minimize it. These arrows will still be present when you do this, allowing you to maximize the course outline when you want to bring it back on to your screen.
Step 4: Course content can be downloaded by:
[6] Clicking on the red paperclip icon will open a document with the available download on screen.
[7] Clicking on the name of the download will start the download of the document to your device.

Mobile
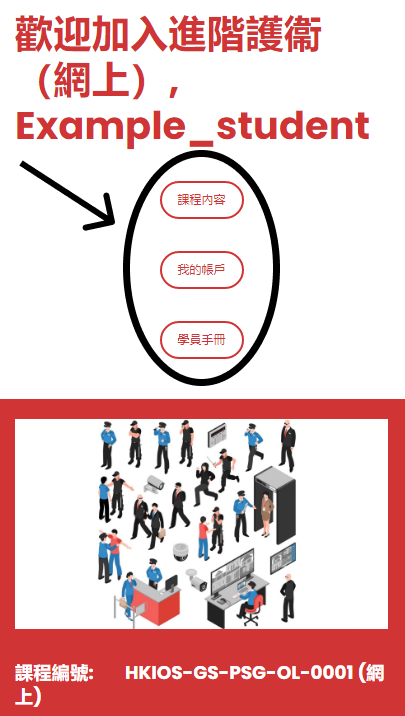
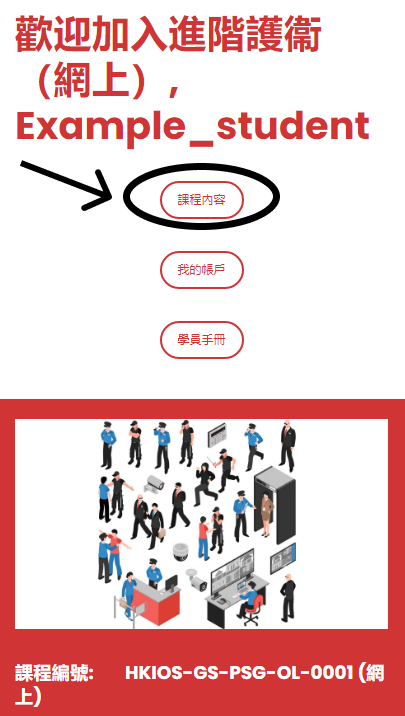
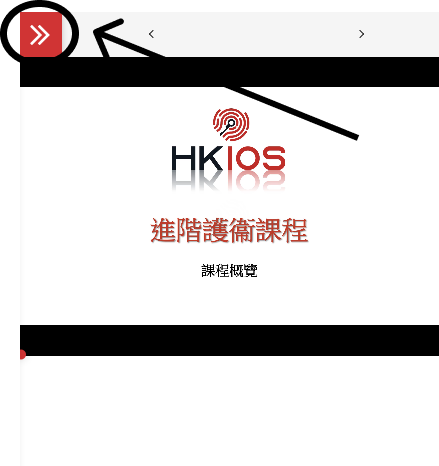
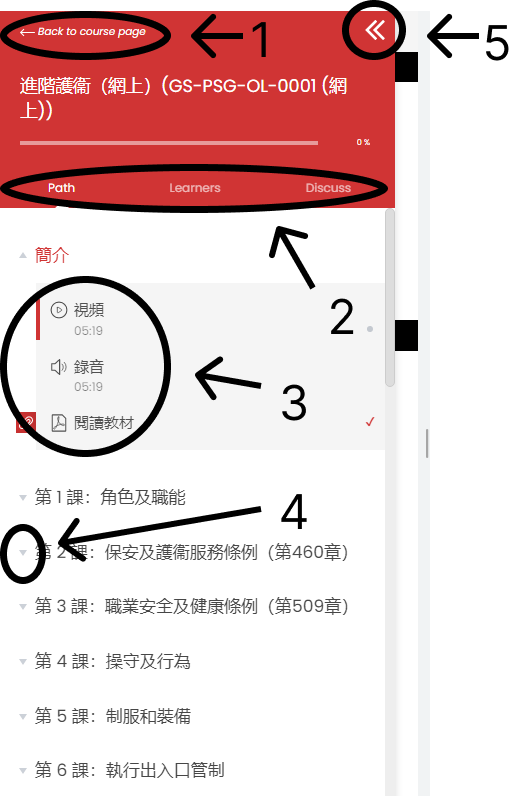
[1] The ‘Back to course page’ button on the top left of the screen will take you back to the course page.
[2] The three navigation buttons on the top of the course content will take you to different functions.
- Path: Path will take you to the content of the course.
- Learners: Learners will show you the other students enrolled into the course, and allow you to see their profiles if you click on their names.
- Discuss: Discuss will allow you to write messages to the other learners of the course, or your trainer. This is useful for asking questions related to certain parts of the course.
[3] Clicking on specific activities within the course will take you to that activity. A red tick will come up to the right of the activity when you have completed it.
[4] Each chapter of the course has a triangle to the left of it – clicking on this triangle will activate a drop-down menu to reveal the activities related to that chapter.
[5] The double arrows on the top right of the course outline will allow you to minimize it. These arrows will still be present when you do this, allowing you to maximize the course outline when you want to bring it back on to your screen.
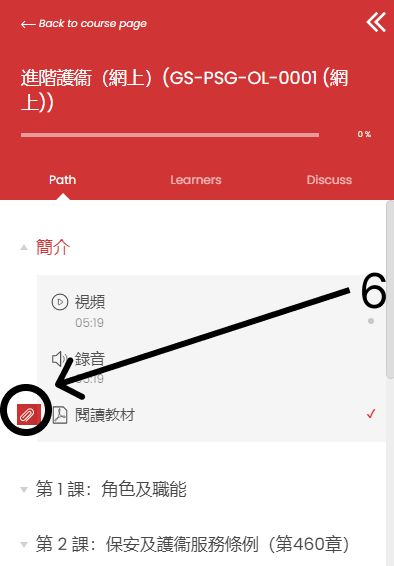
Step 5: Course content can be downloaded by:
[6] Clicking on the red paperclip icon will open a document with the available download on screen.
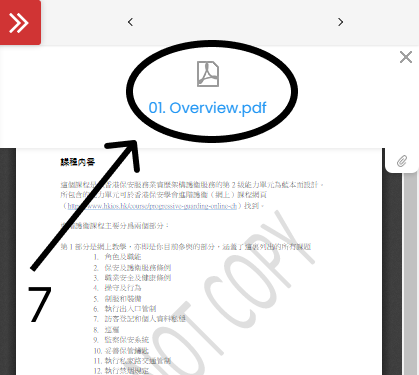
[7] Clicking on the name of the download will start the download of the document to your device.
Upload Assignments
Computer
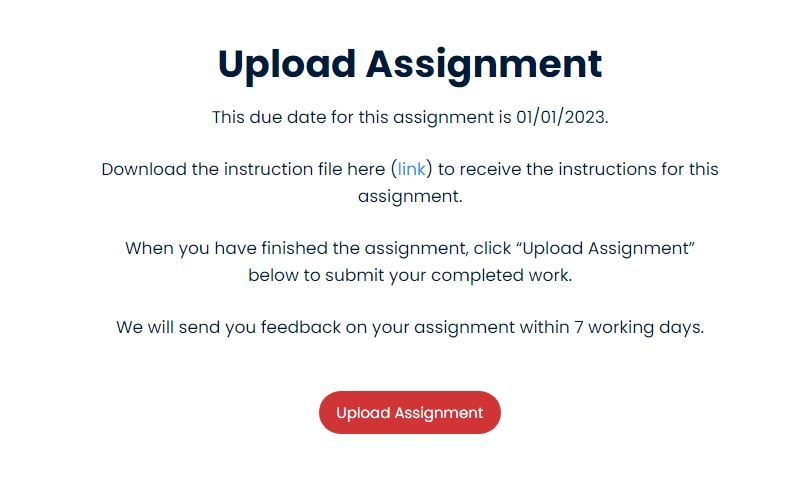
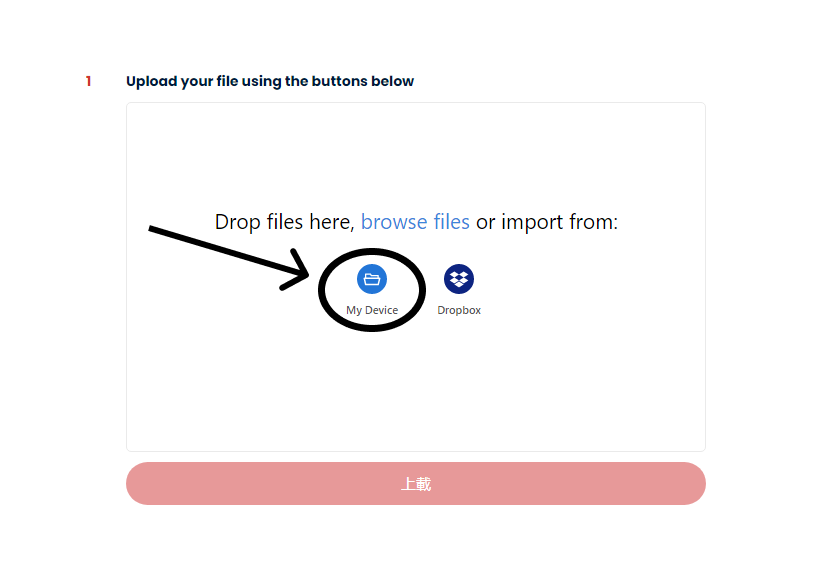
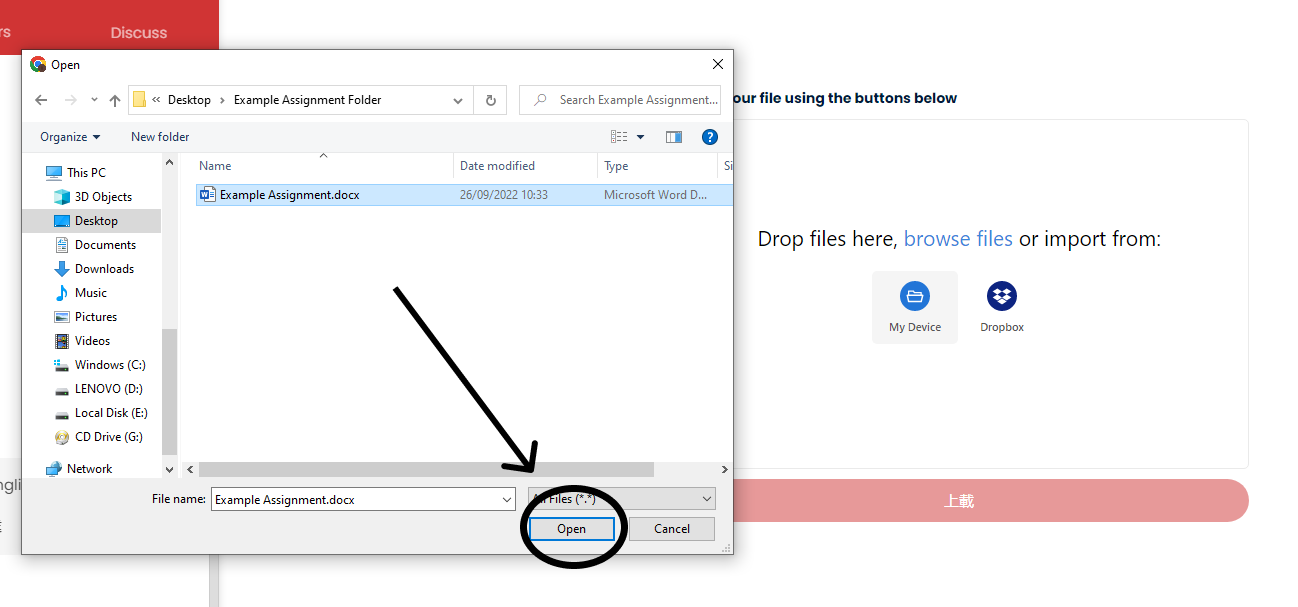
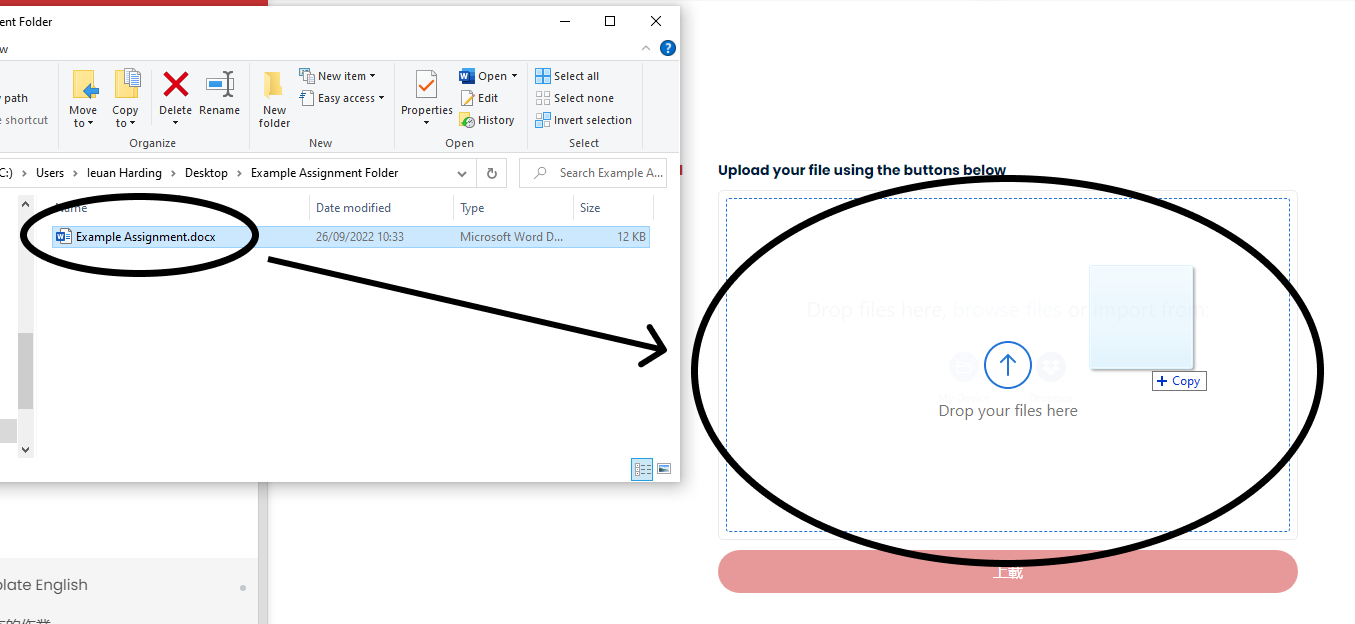
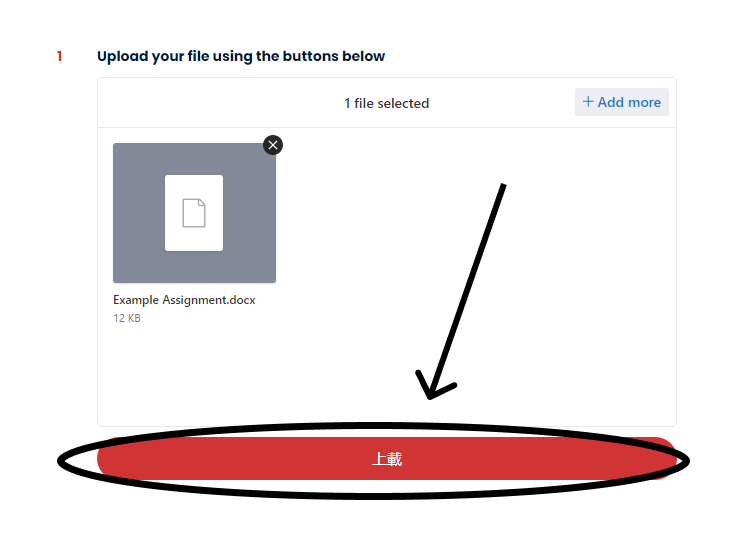
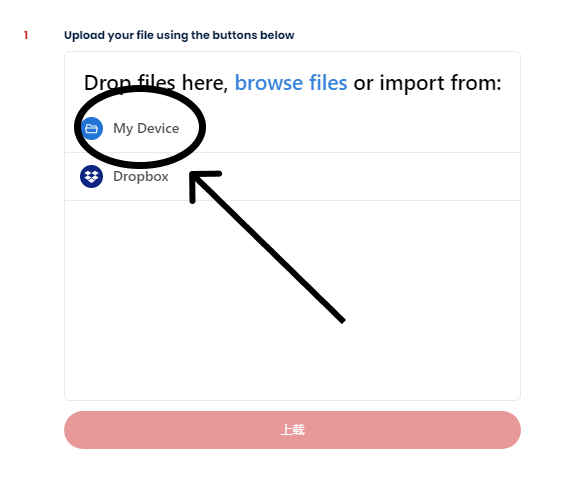
A1: Click 'My Device' to open a window and select the file(s) that you want to upload from your computer.
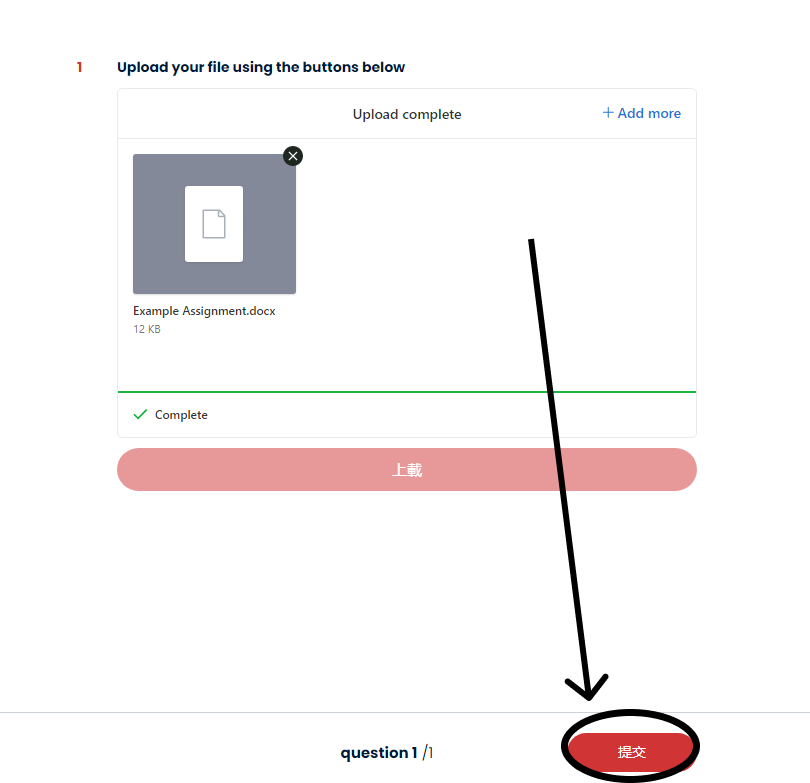

Mobile

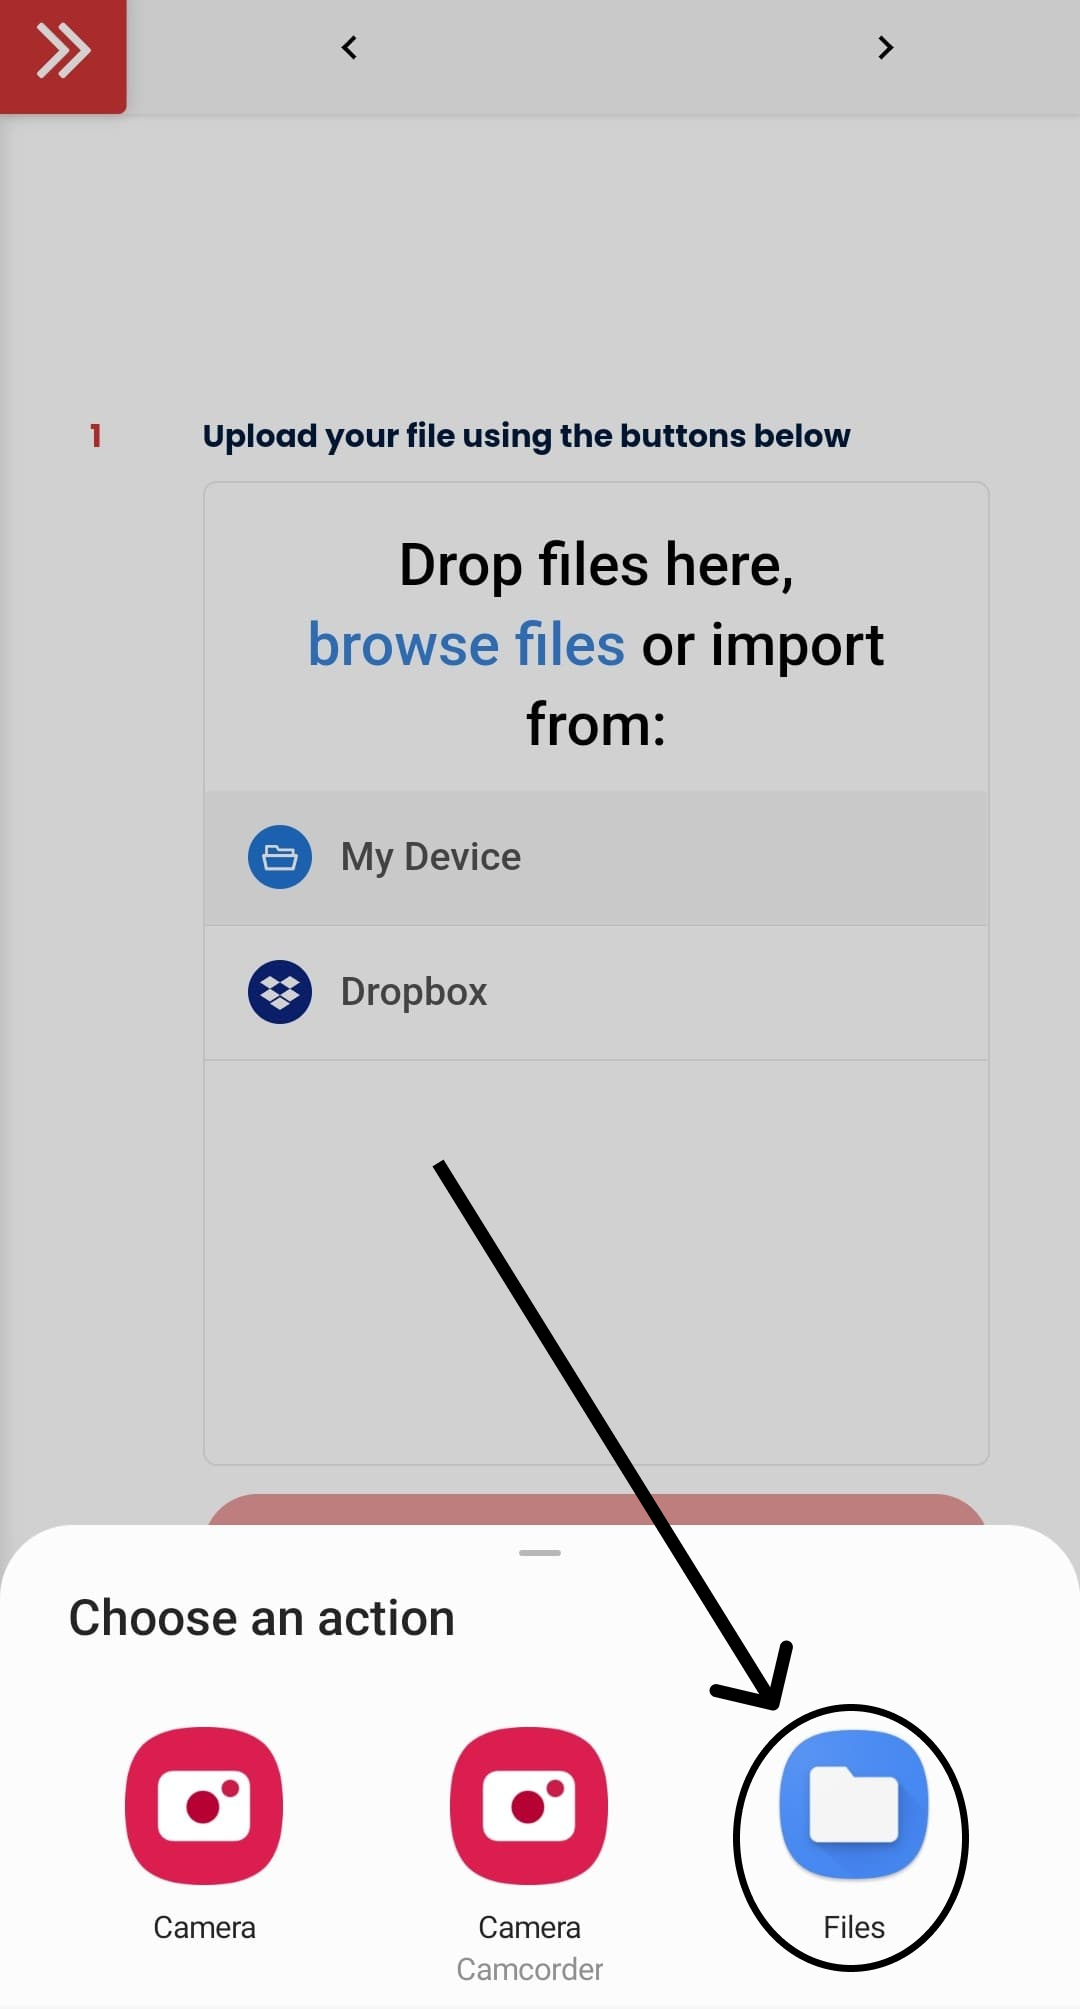


Take Exams/Quizzes
Computer
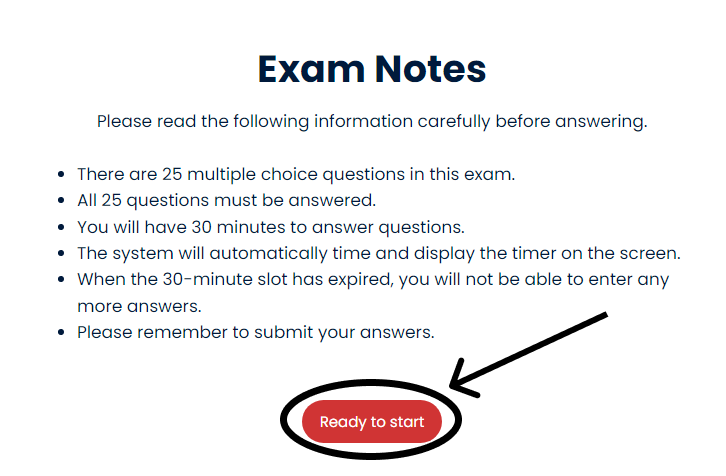
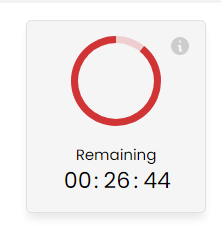
Step 2: Read the examination instructions thoroughly. These instructions should outline the date that the exam is to take place, and exactly how much time you have to take the exam. They will also tell you when you will receive feedback for this exam.
Step 3: When you are ready to start your exam, click the red ‘Start Exam’ button.



Mobile
Step 1: Go to your examination activity.
Step 2: Read the examination instructions thoroughly. These instructions should outline the date that the exam is to take place, and exactly how much time you have to take the exam. They will also tell you when you will receive feedback for this exam.
Step 3: When you are ready to start your exam, click the red ‘Start Exam’ button.


Set up your account
Computer
Step 2: On homepage, click the ‘sign in’ button on the top right of the page.


Mobile
Step 2: On homepage, click the three lines on the top right of the page to open up the mobile menu.


Course Enrolment
Enrolment procedures
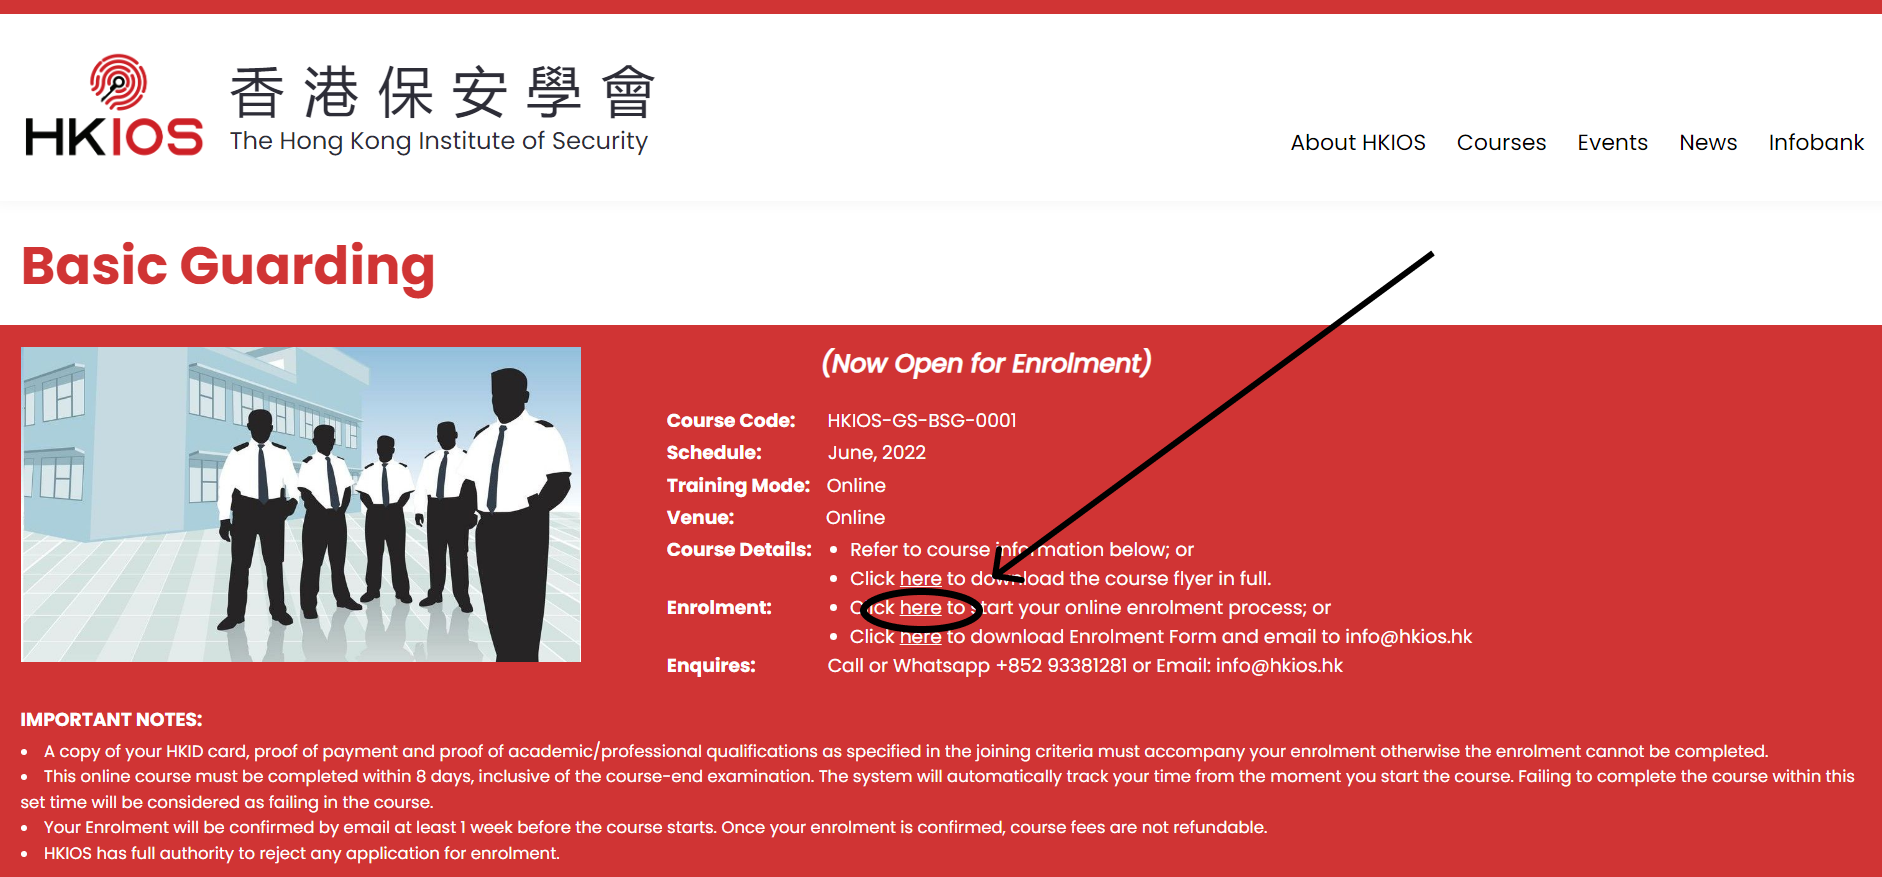
- Follow the enrolment link in the course page (refer to sample course page below) of the course you want to enrol into.
- Complete the enrolment form. If your details have not changed since the last time you have completed this form, click ‘yes’ for the question ‘If you are a current or former student, are all of your details the same as before?’. If you are uncertain whether or not your details might have changed, you should fill the form in again.
- After you have filled in the form, we will contact within 3 working days to let you know whether or not you have been accepted into the course.
Getting help for enrolment
If you are having difficulties enrolling into a course, or you have any questions, please contact us by email at info@hkios.hk or text or call us at +852 9338 1281.
Withdrawing from a course
If you cancel your enrolment before receiving our confirmation, we shall return your course fees if you ask for a refund. Once your enrolment is confirmed, course fees are not refundable. Depending on your reasons for cancellation, we may allow you to keep your fees for the next course that you take with us.
Code of Conduct
Code of Conduct
- Respect the privacy of other students
- Use a single account on this platform and provide truthful and accurate information whilst doing so
- Do not reproduce content from this course or from other participants unless expressly allowed to do so
- Do not submit the work of others as their own, or engage in activity that will harm the grades of other students
Copyright
Our courses use materials that have been licensed or developed by HKIOS, our affiliates or other relevant third parties. These materials are the property of the respective developer and are provided only for the use of students during the course. You may not distribute, publish, or reuse the materials, audio files, images or design of any of the curriculum. You are authorized to view, copy, and print documents contained within the portal and courses, subject to the agreement that:
- Your use is for the performance of coursework as required by the instructor teaching the course for which you are registered.
- All copyright or proprietary notices are displayed on all copies
- You will not reuse any material contained on the portal or courses without our express permission
- You will not copy any codes or graphics contained in the site without our express permission
Harassment and Harassment Reporting
Certification
A trainee must attain "successful completion" in a course before he/she will be awarded a "Certificate of Completion" for the course. To achieve successful completion of a course, a trainee must meet the Assessment requirements and attain 100% attendance in a timely manner.
Attendance and Absence
Performance Assessment
- Practical exercises
- Assignments
- Examinations
Assignments
Examinations
Examinations will primarily be face-to-face and may be in the form of either one of the following:
- Multiple-choice questions
- Short questions
Some online courses may have the examination online, details of which will be made available at their Course Page.
Disqualification and Appeal
Disqualification
Appeal
Joining the HKIOS Alumni
How to join the HKIOS Alumni?
Resources and Help
How to access our online services
How to get technical help
Technology requirements for attending HKIOS courses
Arrangements during bad weather
Classes and Exams that have not yet started:
Signal No. 1 or 3
Signal No. 8 or above
- When the Hong Kong Observatory announces that Signal No. 8 has been hoisted; OR
- When the Hong Kong Observatory announces that Signal No. 8 will be hoisted on the day
Classes and Exams that have already started:
Discount, Payment and Refund
Discount
Financial Assistance
Fees Payment Arrangement
Refund
If you cancel your enrolment before receiving our confirmation, we shall return your course fees if you ask for a refund. Once your enrolment is confirmed, course fees are not refundable. Depending on your reasons for cancellation, we may allow you to keep your fees for the next course that you take with us.
Anti-epidemic Measures
Anti-epidemic Measures
- Course participants are required to take the latest anti-epidemic measures announced by the HKGov prior to attending a class.
- Course participants must wear a mask in class.
- Course participants are not allowed to eat at the training venue.
- Course participants should bring their own drinks and writing materials.
>>> Learn
>>> 學習
>>> Share
>>> 分享
>>> Grow
>>> 成長
Copyright © 2026 The Hong Kong Institute of Security Limited. All rights reserved.
Penny Fung

- Penny served in the Hong Kong Police in 1976-1993, primarily in criminal investigation with special focus on commercial crime investigation and crime prevention. She left as a Detective Senior Inspector.
- Penny served in two international banks in Asia. She served in the Standard Chartered Bank in 1993-2000 and left as its Area Head – Security & Operations Risk Management for Hong Kong, China, and Northeast Asia. She also served in the Bank of America and later Bank of America Merrill Lynch in 2006-2011 as its Regional Director of Security and Regional Director of Investigations in Asia.
- Penny has been a security risk consultant since 2000. She was the Associate Managing Director of Kroll Associates (Asia) Ltd. in 2000-2003 and has been the Principal Consultant of “K2 Consulting Co. Ltd. (K2)” since 2011.
- Penny founded K2 in 2003, which initially focused on offering security management training and later expanded to security consulting services. K2 had been the training partner of the “International Professional Security Association – Hong Kong (IPSA HK)” until the establishment of the Hong Kong Institute of Security in 2022.
Penny has been a pioneer in promoting professional development of the security services in Hong Kong since the 1990’s:
- Penny was the Chairperson of IPSA HK in 1993-2003 and 2009-2011 and led in re-defining the criteria for membership advancement to include professional qualifications and practical working experiences.
- Penny was an appointed member of the Security Services Training Board of the Vocational Training Council (“VTC”) in 1998-2006 and led in the first manpower survey of the security industry in Hong Kong, among others.
- Penny was a Board Director of the Association of Certified Fraud Examiners - Hong Kong Chapter and served as its President in 2009-2011 and Director of Training in 2007-2009. She was instrumental in developing and launching the Investigations Training programme of the Hong Kong Chapter.
- In 2013-2018, Penny was appointed by the Education Bureau as a member of the Industry Technical Advisory Committee of the Qualifications Framework for Security Services. She led in the establishment of the Specification of Competency Standards (“SCS”). On assignment by the VTC, she authored several SCS-based training packages as essential learning and assessment guidelines for security training. She has also been appointed as the Assessor and Question Writer of the Recognition of Prior Learning Programme under the QF for Security Services since 2021.
Penny received her security training in the Home Office in UK, the Edith Cowan University in Australia, and the University of Louisville in the US. She also holds a Diploma in Adult Education and Training by the HKUSPACE.
Penny is a Fellow Member of IPSA HK, Diplomate of the International Institute of Security, Certified Business Continuity Professional of the Disaster Recovery Institute, and Certified Fraud Examiner of the Association of Certified Fraud Examiners.
Subscribe to our newsletter now!
2022.11.04 – 丙類保安工作的最高年齡限制由55 歲提升至60 歲
請參閱:保安及護衞業管理委員會 (SGSIA ) - 簽發保安人員許可證準則 https://www.sb.gov.hk/chi/links/sgsia/pdffile/GN%20-%20Criteria%20for%20Security%20Personnel%20Permit%20(Chi).pdf
2022.11.04 – upper age limit for Cat C security work raised from 55 to 60
Please refer to: SGSIA - Criteria for Issuing a Security Personnel Permit https://www.sb.gov.hk/eng/links/sgsia/pdf/GN%20-%20Criteria%20for%20Security%20Personnel%20Permit%20(Eng).pdf


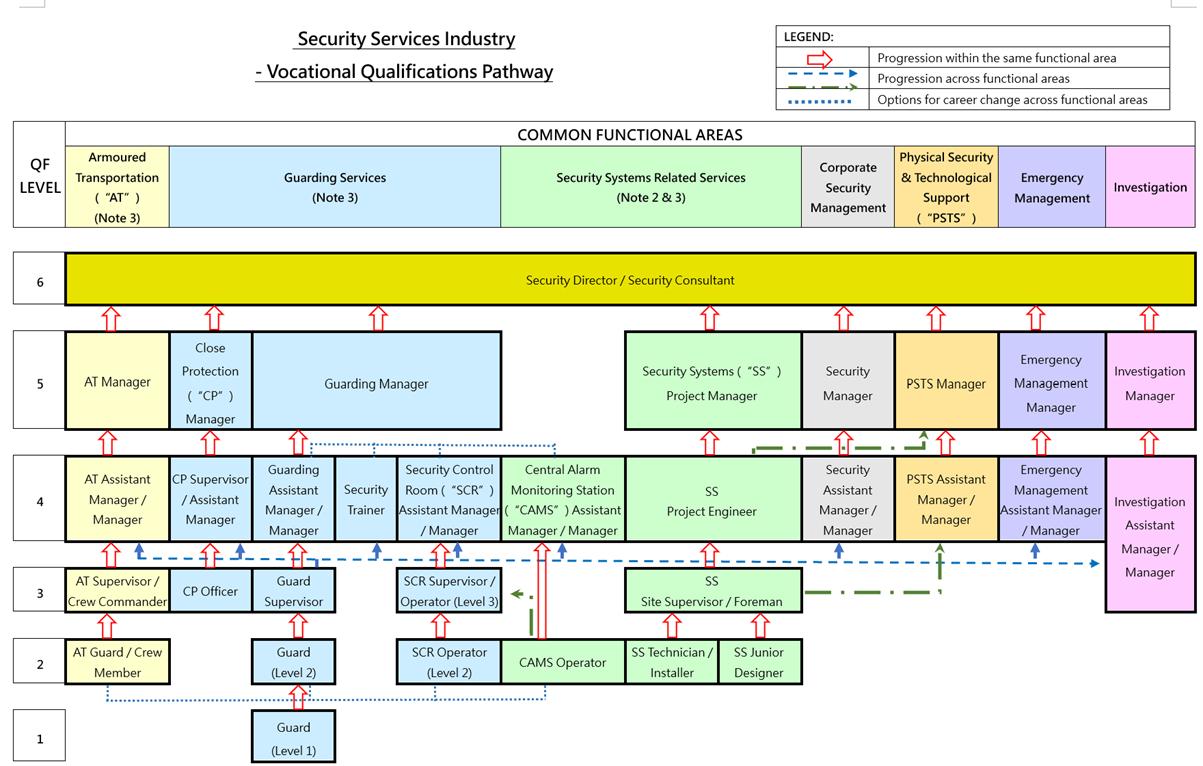
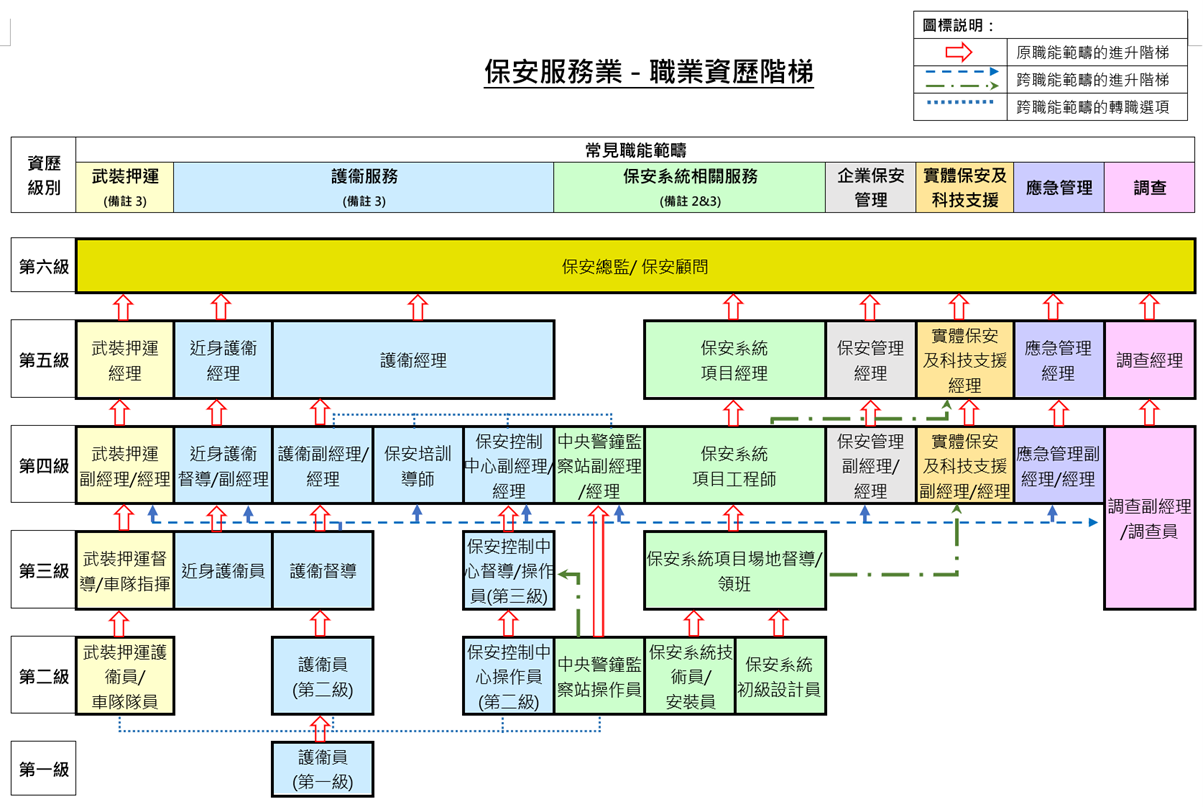
Education and training institutions can now make use of this VQP to design relevant training courses and security practitioners can also make more structured plans for their career and personal development in the security industry.


主席
The Authority consists of a Chairman and five Members appointed by the
Chief Executive, as well as a representative of the Secretary for Security. A
secretariat has been set up to provide day-to-day administrative support to the
Authority.
Chairman
Mr. Stephen YIP Chun-nam, B.B.S, M.H., J.P.
Members
Dr Terence CHAN Ho-wah
Mr YIU Ming, M.H.
The Honourable KWOK Wai-keung, J.P.
Ms KUOK Hui-kwong
Mr LAU Ka-keung, B.B.S, M.H., J.P.
A representative of the Secretary for Security
Secretary
According to the conviction records in the previous two years published by the Labour Department (https://www.labour.gov.hk/common/osh/pdf/Conviction_record_en.pdf), in April 2023, Thorn Security (Hong Kong) Limited was convicted of an offence of “Failing to ensure workman wearing suitable safety helmet” and fined $6,000.
According to various media reports, the Labour Department has completed its investigation in March this year into the incident at a Maternal and Child Health Centre in Yau Ma Tei on August 15 last year, in which a female security guard was pressed by a toppled leaf of the gate and died. Wise Security Limited, the employer of the female security guard, was summonsed for an offence of “Failing to ensure the safety and health of employees” while four other occupiers were also summonsed. The case is still under trial. (Case reference: KTS 3046-3050/2023).
根據勞工處過往兩年的定罪記錄(https://www.labour.gov.hk/common/osh/pdf/Conviction_record_en.pdf), 2023年4月 Thorn Security (Hong Kong) Limited 被定罪 “Failing to ensure workman wearing suitable safety helmet”及罰款$6000。
而根據各媒體的新聞報導,去年8月15日油麻地母嬰健康院發生鐵閘倒塌事故意外導致一名43歲女保安被壓中身亡事故,勞工處已於今年三月份完成調查,並票控其僱主威智護衛有限公司「沒有確保僱員的安全及健康」,還有其他四個相關的處所佔用人亦被票控,案件尚在審理中(案件編號:KTS 3046- 3050/ 2023)。
Webinar
Missed this talk?
(1) Opening and introduction
HKQF for Security Services - how to obtain recognition under the "Recognition of Prior Learning" mechanism
(CSI / IPSA HK / HKIOS members, students and employees are encouraged to attend)
「保安業資歷架構」已經推出多年,擁有豐富保安工作經驗,但欠缺學歷或保安專業資歷的從業員,可以透過「過往資歷認可」機制去確認他們已經具備的保安資歷級別。這個分享會會為大家介紹「保安業資歷架構」及「過往資歷認可」機制,並邀請到幾位業內人士與大家分享他們如何透過「過往資歷認可」機制成功獲取第四級資歷認可的經驗。
香港保安學會培訓及專業發展總監
衞業有限公司高級行動經理
國際專業保安協會(香港)執行委員會委員;資深保安從業員
Webinar
Design Thinking: Optimizing Workforce and Improving Operational Efficiency
(For CSI / IPSA HK / HKIOS members, students and employees only)
Design thinking is a people-oriented way of thinking and design that solves problems and innovates. In this seminar, it is our great honor to invite two authorities in design thinking and innovation management – Mr. David Chung and Ms. Yan Choi to introduce design thinking and talk about how to apply it to improve the labor force and operational efficiency of the security industry.
Founder and Managing Partner, InnoEdge Consulting Ltd.
Board Member, Global Innovation Management Institute
Senior Consultant, InnoEdge Consulting Ltd.
Certified Instructor, Design Thinking
Chief Innovation Officer, Shop! Asia
網上研討會
設計思維:優化勞動力,提升營運效能
(只供 CSI / IPSA HK / HKIOS 會員、學員及屬員參加)
經驗分享會
保安業資歷架構 – 如何透過「過往資歷認可」機制獲取資歷認可?
(歡迎 CSI / IPSA HK / HKIOS 會員、學員、屬員及保安業內人士參加)
香港保安學會培訓及專業發展總監
衞業有限公司高級行動經理
國際專業保安協會(香港)執行委員會委員;資深保安從業員


2024年8個實體保安趨勢預測 / Top 8 Physical Security
Trends in 2024
實體保安與IT的融合正在加速,並且不會只局限於技術方面。
未來一年,不少機構會尋求優化IT與實體保安團隊之間的協作。這兩個寶貴技術的連結,會讓機構更有效地應對風險和最大化利用機構的整體數據。儘管沒有一刀切的方法,大多數人都會考慮以下的策略:
- 實體保安的領導者會擴展其部門的IT專業能力
- 保安運作的功能將會擴大,以便應對實體保安風險和利用來自兩個群體的數據
- IT團隊亦會引入實體保安,並開始負上監督實體保安任務
隨著這些以人為本的整合的不斷發展,對統一系統和雲端連結的實體保安解決方案的需求亦會隨之增長。這將會幫助團隊全面了解系統和不斷變化的風險,同時幫助他們從數據中提取更多有用的訊息。
實體保安數據民主化正在進行中。與過往相比,愈來愈多雇員需要接觸實體保安技術和數據。Genetec的2024年實體保安趨勢研究報告指出,近40%的機構仍面臨實體保安勞動力短缺問題。對特定任務或資訊存取的把關只會加劇資源的壓力。
隨著數位時代雇員角色的轉變,機構將尋求更具協作性的實體保安技術。它們需要更容易使用的解決方案,並且能支援保安部門以外的人員安全及有限度的使用。
這帶來的現象,將包括:犯罪現場的目擊者能夠安全地將其手機的錄影共享到中央證據貯存庫或團隊負責人監督與其部門相關的存取請求。
對許多機構來說,這將會增強整個企業的勞動力,亦會幫助它們擴大保安投資的價值和應用範圍。
出入管制現代化仍將是各機構於2024年的首要任務。為了減輕系統升級的複雜性,不少機構將轉向採用混合雲端模式及雲端就緒的出入口管制解決方案。這將帶來持續的創新和網絡安全更新,從而加強從門到網絡的安全。
我們亦將看到對開放出入管制解決方案的更大需求。比過往任何時候,各機構都更希望能夠自由地添加和連接現有的最新技術。到2024年,這將包括從物業管理系統、生命和安全解決方案到人力資源管理軟體和行動憑證等等。
將出入管制與這些不同的技術相結合,可以提高營運效率和持續發展的主動性。亦會讓雇主增進持卡人的體驗,尤其是對流暢和方便的感覺。
很多人將捨棄單獨管理錄影和出入口管理系統。為了提高效率,領導者將採取行動實現系統統一。這將簡化系統監控和維護任務,從而提高企業產能並節省成本。
到2024年,實體保安業對混合雲的採用將大幅增加。最近的研究發現,44%的機構已經在超過四分之一的實體保安部署了雲端或混合雲環境。
隨著雲端採用率的上升,人們對新的即插即用、雲端就緒設備愈來愈感興趣。它們不單只讓採用雲端服務更容易,還增強了邊緣的運算能力。
我們也將看到人們對雲端數據的使用和相關成本的關注。那些已經採用了混合雲的人們正在尋求從雲端支出得到最大回報的方案。很多人將依靠渠道合作夥伴以探索保安以外的用例,最大限度地提高混合雲的投資回報。
近年,警察部門一直在努力招募和留住警員。為了解決這個問題,許多城市正在投資新的打擊犯罪技術。從車輛調查系統和態勢感知平台到無人機和可穿戴設備,全部都使有助於提高公共安全部門的效率。
隨著科技的使用在城市中擴展,公共穩私問題也隨之增加。2024年,我們將看到城市越來越致力於建立更多公眾信任並加強穩私保護工作。以下的核心策略將有幫助:
- 選擇採用以穩私為本而設計的解決方案,以便能更佳地控制所收集、處理和共享的數據。
- 與值得信賴的技術供應商合作,確保優化所有防線並強化系統。
- 採取更透明的措施來保護資訊,並分享新科技投資如何增強社區安全的指標。
- 創建合作夥伴計劃讓公民呈報事故、提供回饋和參與社區警務工作。
進入市場的實體保安設備和其他工業物聯網感測器的數量正在增加,但仍未能滿足各個行業的機構的需要。IT和保安專家希望擴展其保安部署的數據類型。此外,他們亦希望從貯存系統中抽取數據,並建立數據湖以服務未來的目標。
在這關鍵時刻,選擇以API為中心及開放架構的統一實體保安平台的人將隨著時間的推移獲得最大收益。他們可以就著自身條件靈活地組合和同時分析不同來源的數據。最終,這能夠為新的數據驅動策略提供信息,並最大限度地提高所有科技投資的回報。
在數據湧現期間,許多機構還須尋找方法來增強操作員的能力,並將當前的工作流程數位化。因此,付帶嵌入式分析、自動化工具和視覺儀表板的實體保安解決方案的需求將會增加。
據IBM稱,2023年的每宗數據外洩事故的平均成本為445萬美元。當中只有三分之一的公司是透過內部保安團隊來識別漏洞。
2023年,31% 的終端用戶表示他們的機構成為網絡犯罪分子的目標。儘管各機構不斷改善網絡安全措施,人們對網絡安全的擔憂程度仍在持續上升。



The 2026 State of Security:
Synthesizing Insights from SIA, Genetec & Security Magazine
Synthesizing Insights from SIA, Genetec & Security Magazine

What happens when AI automation meets a global labor shortage?
At HKIOS, we have analyzed the latest 2026 forecasts from three industry heavyweights: The Security Industry Association (SIA), Genetec, and Security Magazine. While each report focuses on different angles, a singular, powerful narrative has emerged for the year ahead.
The Three Pillars of the 2026 Landscape:
🔹 1. The AI Disruption (SIA): The headline trend is "Software Eats the World... AI Eats Software." SIA predicts that "Agentic AI" will move beyond simple detection to active automation, handling complex workflows in the SOC and redefining the role of human operators from reactive to strategic.
🔹 2. The Hybrid Standard (Genetec): Physical security is no longer standalone. The industry is moving decisively toward a Hybrid Cloud architecture where physical guards and digital systems (IoT, Access Control) operate as one unified ecosystem.
🔹 3. The Competency Gap (Security Magazine): As systems become smarter, the workforce gap widens. The challenge is no longer just finding people—it is finding tech-literate professionals capable of managing these hybrid environments. The industry must pivot from a headcount-based model to a "Value Chain" model, proving the "Return on Security" to business stakeholders.
The Implications for Hong Kong: For local practitioners, the message is clear: Resilience in 2026 requires blending traditional vigilance with modern digital capability.
At HKIOS, we bridge this gap. Our HKQF-recognized training is designed to upskill the workforce for this exact "Man + Machine" future.
🔗Read the Reports:
- SIA Megatrends: securityindustry.org/reports
- Genetec State of Physical Security: genetec.com/a/state-of-physical-security
- Security Magazine: securitymagazine.com
🚀 Equip your team with HKIOS: www.hkios.hk
【2026 保安業年度前瞻】

踏入 2026,保安業正面臨前所未有的轉折點。HKIOS 綜合了全球三大權威報告 — SIA (Security Industry Association)、Genetec 及 Security Magazine 的最新數據,為香港業界整理出未來的核心變局:
📊 三大報告.一個共識:
1️⃣ SIA 預測:AI「吞噬」軟件 (Automation) 如果說過去十年是軟件主導,SIA 指出未來將是 「代理型 AI (Agentic AI)」 的時代。AI 將由「被動輔助」升級為「主動操作」,自動化處理警報與監控,徹底改變控制室 (SOC) 的運作模式。
2️⃣ Genetec 洞察:混合保安成主流 (Hybrid Security) 單靠人手已成過去。Genetec 報告強調,未來的保安是 「實體人手 + 雲端科技」 的深度協作。前線人員的角色,正由「看守者」轉型為懂得操作智能系統的「管理者」。
3️⃣ Security Magazine 警示:技能斷層 (Competency Gap) 全球面對人手荒,但缺的不再只是體力勞動者,而是具備數碼素養的高技術專才。行業正由「鬥人頭」轉向「鬥能力」,唯有證明 「保安回報率 (Return on Security)」,才能擺脫成本中心的標籤。
HKIOS 的回應: 面對「AI 自動化」與「人手短缺」的雙重夾擊,「持續進修」 是唯一出路。HKIOS 致力引入國際標準 (HKQF),協助你由傳統保安轉型為未來專才。
📚 參考報告:
SIA Megatrends: securityindustry.org/reports
Genetec State of Physical Security: www.genetec.com/a/state-of-physical-security
Security Magazine: www.securitymagazine.com/topics/2237-guard-services
👉 立即裝備未來技能:www.hkios.hk
Hong Kong Institute of Security (HKIOS)
Annual Progress Report 2025
Date: December 12, 2025
To: Supporting Organisations, Board of
Advisers, Executive Committee, Trainers, and Students
Dear HKIOS
Community,
1. CEO’s Message: A Year of Growth Together
As 2025 comes to a close, we are thrilled to look back on a year of shared growth and industry recognition. It has been a pleasure moving from being just a training provider to a true partner in your professional journey.
Our goal
this year was simple: to bring you courses that meet the highest standards of
the Hong Kong Qualifications Framework
(HKQF) and the PropertyManagement
Services Authority (PMSA), while making them more accessible than ever.
Here is a
snapshot of what we achieved together in 2025 and where we are heading next.
2. Key Achievements in 2025
A. More Recognition & Funding for You
We worked hard to ensure your training pays off - literally and professionally.
- HKQF Star Training Institute Award: We are honoured to have received the "Star Training Institute" award from the HKQF, a prestigious recognition of our teaching quality and commitment to professionalizing the industry.
- CEF Funding: Our Certificate in Basic Guarding (QASRS) (Level 1) and Professional Certificate for Security Trainers (Level 4) are now CEF eligible, making it much easier to fund your studies.
- PMSA Recognition: Our core management modules now count towards CPD hours for Property Management Practitioners (Tier 1 & Tier 2), helping you maintain your professional license with ease.
B. Learning That Fits Your Schedule
We know
you are busy, so we fully rolled out our Hybrid Learning Mode for Level 2 to
Level 4 courses.
- By mixing Online Theory with In-Person Scenario Drills, you can learn at your own pace without missing out on practical training.
- This model is now live for our Security Management (Level 4), Progressive Guarding (Level 2), and Guarding Supervision (Level 3) courses.
C. Supporting the Workforce
We
remained agile to help solve industry staffing challenges:
- Imported Labour: We launched the Guarding Operation (L1) Online course to help imported workers prepare for the Trade Test, assisting employers in integrating new staff quickly.
- Upskilling: Our new Guarding Operation (L2) Online course helps long-serving staff and managers refresh their skills to meet modern standards.
- Inclusivity: We continued our quarterly English stream Certificate in Basic Guarding (QASRS) courses to support our non-Chinese speaking community.
3. Community & Corporate Engagement
We loved connecting with you beyond the classroom this year:
- Webinars: From mid-year onwards, our webinar series kept you in the loop on critical trends like AI and legal updates, connecting hundreds of professionals across the region.
- Strategic Partnerships:
- K2 Consulting Co. Ltd.: We partnered to deliver specialized internal investigation training, including for critical infrastructure operators.
- Chamber of Security Industry: We are honoured to be training partners with the Chamber, working together to raise the bar for industry competitiveness and standards.
- Digital Community: Our Facebook page and website have become lively hubs for news and networking—thank you for engaging with us online!
4. Looking Ahead to 2026
Building on this success, our vision for 2026 focuses on three simple goals:
- Connecting Alumni: We want to build a stronger community among graduates and encourage continuous learning.
- More Choices: We will expand our list of HKQF-recognized courses to give you more verified career pathways.
- Aiming Higher: We are exploring opportunities for even higher-level professional training to keep you ahead of the curve.
5. Thank You
A huge thank you to our Trainers for sharing their wisdom, our Advisers & Committee for their guidance, and our Supporting Organisations for their backing.
Most
importantly, thank you to our Alumni and
Trainees. Your drive to improve inspires us every day.
Here’s to
a fantastic 2026!
HKIOS Management Team www.hkios.hk
香港保安學會 (HKIOS)
2025年度進度報告
日期: 2025年12月12日
致:各支持機構、顧問委員會、執行委員會、導師及學員
各位 HKIOS 成員:
1. 會長的話:共同成長的一年
隨著 2025 年即將結束,我們很高興能回顧這充滿共同成長與行業認可的一年。很高興能從單純的培訓機構,轉變為您專業旅途上的真正夥伴。
我們今年的目標很簡單:為您提供符合香港資歷架構 (HKQF)及物業管理業監管局 (PMSA)最高標準的課程,同時讓這些課程比以往更容易報讀。
以下是我們在 2025 年共同取得的成就以及未來的方向。
2. 2025年主要成就
A. 為您爭取更多認可與資助
我們努力確保您的培訓在金錢和專業上都物有所值。
· HKQF 殊榮:我們榮獲香港資歷架構頒發「星級培訓機構」獎項,這是對我們教學質素及推動行業專業化的高度肯定。
· CEF 資助:我們的「基礎護衞(QASRS)證書(第一級)」及「保安導師專業證書(第四級)」現已納入CEF 可獲發還款項課程,讓您進修更輕鬆。
· PMSA 認可:我們的核心管理單元現已獲認可為物業管理從業員(第1級及第2級)的CPD 時數,助您輕鬆維持專業牌照。
B. 配合您日程的學習模式
我們深知您公務繁忙,因此全面推行了針對第二級至第四級課程的混合學習模式。
- 透過結合網上理論與面授情景演練,您既可按自己進度學習,又不會錯過實務訓練。
- 此模式現已應用於我們的「保安管理(第四級)」、「進階護衞(第二級)」及「護衞督導(第三級)」課程。
C. 支援業界人手
我們保持靈活,協助解決行業人手挑戰:
- 輸入勞工:我們推出了「護衞運作(第一級)網上課程」,協助輸入勞工準備「技能測試」,幫助僱主快速整合新員工。
- 提升技能:我們的「護衞運作(第二級)網上課程」協助資深員工及管理層更新技能,以符合現代標準。
- 共融:我們繼續每季舉辦英語授課的「基礎護衞(QASRS)」課程,支援非華語社群。
3. 社區與企業參與
今年我們很高興能在課堂以外與大家聯繫:
- 網上研討會:從年中開始,我們的研討會系列讓您緊貼 AI 及法律更新等關鍵趨勢,連結了區內數以百計的專才。
- 策略性合作夥伴:
- K2 Consulting Co. Ltd.:我們合作提供了專門的內部調查培訓,對象包括關鍵基礎設施營運商。
- 保安業商會 (Chamber of Security Industry):我們很榮幸能成為商會的培訓合作夥伴,攜手提升行業競爭力及標準。
- 數碼社群:我們的 Facebook 專頁及網站已成為新聞及交流的熱鬧樞紐——感謝您在網上與我們互動!
4. 展望 2026
建基於此成功,我們 2026 年的願景聚焦於三個簡單目標:
- 連繫校友:我們希望在畢業生之間建立更強大的社群,並鼓勵持續學習。
- 更多選擇:我們將擴展 HKQF 認可課程名單,為您提供更多經認證的事業途徑。
- 志存高遠:我們正探索更高階的專業培訓機會,助您保持領先優勢。
5. 致謝
衷心感謝我們的導師分享智慧、顧問及委員會提供指導,以及各支持機構的鼎力相助。
最重要的是,感謝我們的學員。你們求進的動力每天都在激勵著我們。
願我們迎來精彩的 2026 年!
香港保安學會 (HKIOS) 管理團隊 www.hkios.hk


